Workview Animations
Requirements
The following scripts are required to use Workview Animations:
scWorkviewAnimationscAlertscSuffixscPrototypes
WideQuick Modular Framework includes a built-in animation system that displays status colors on objects to indicate their current state — from alarms and warnings to active and manual override. The system is driven by tag suffixes, meaning the color an object displays is determined by which signals are active on that object.
For more information on tag suffixes see Tag Structure.
How it works
When a DynTouch object is placed on an object in WideQuick Designer®, it
automatically calls the AnimationHandler() function in the scWorkviewAnimation
script. This creates a handler that watches all Data Store signals matching the
object's tag name combined with the configured suffixes. The handler exposes a
boolean for each category — for example animation.alarm or animation.warning,
where animation is the reference to the handler — which is true when any signal
in that category is active.
This animation state is automatically shared with all child objects in the group, so each visual element can respond independently to its assigned category.
All common components in the standard object libraries come with pre-built animated objects that work out of the box, covering the alarm, warning, active, and ManAuto categories. Service animation is not included in the standard objects by default — the example in Building a custom animated motor object demonstrates how to add it to a custom object.
For most integrators, only the suffix configuration in runtime is required. Creating custom animated objects is covered in Creating custom animated objects.
Configuring categories and suffixes
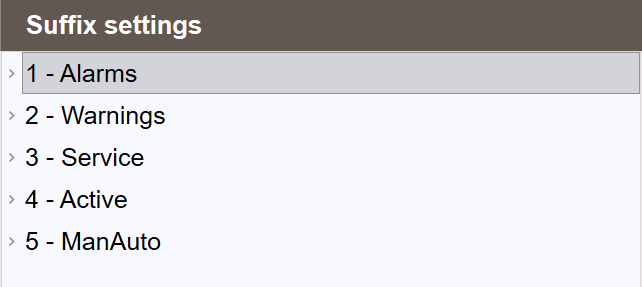
The animation categories and their suffix aliases are configured in WideQuick Runtime® by navigating to Settings → Suffix → Suffix - Alarms.
The settings are organised in two levels:
- Groups — define the animation category and its color. Five groups are available by default: 1 - Alarms, 2 - Warnings, 3 - Service, 4 - Active, and 5 - ManAuto.
- Suffix aliases — defined within each group. Each alias has a human-readable
name, such as
Fault Alarm, and is connected to an actual tag suffix, such as_LF. When a signal ending in that suffix becomes active, the object animates in the color of the group the alias belongs to.
Groups are prioritized by their number — lower numbers take priority. If an object has both an active alarm and a warning, the alarm takes priority since it is group 1.
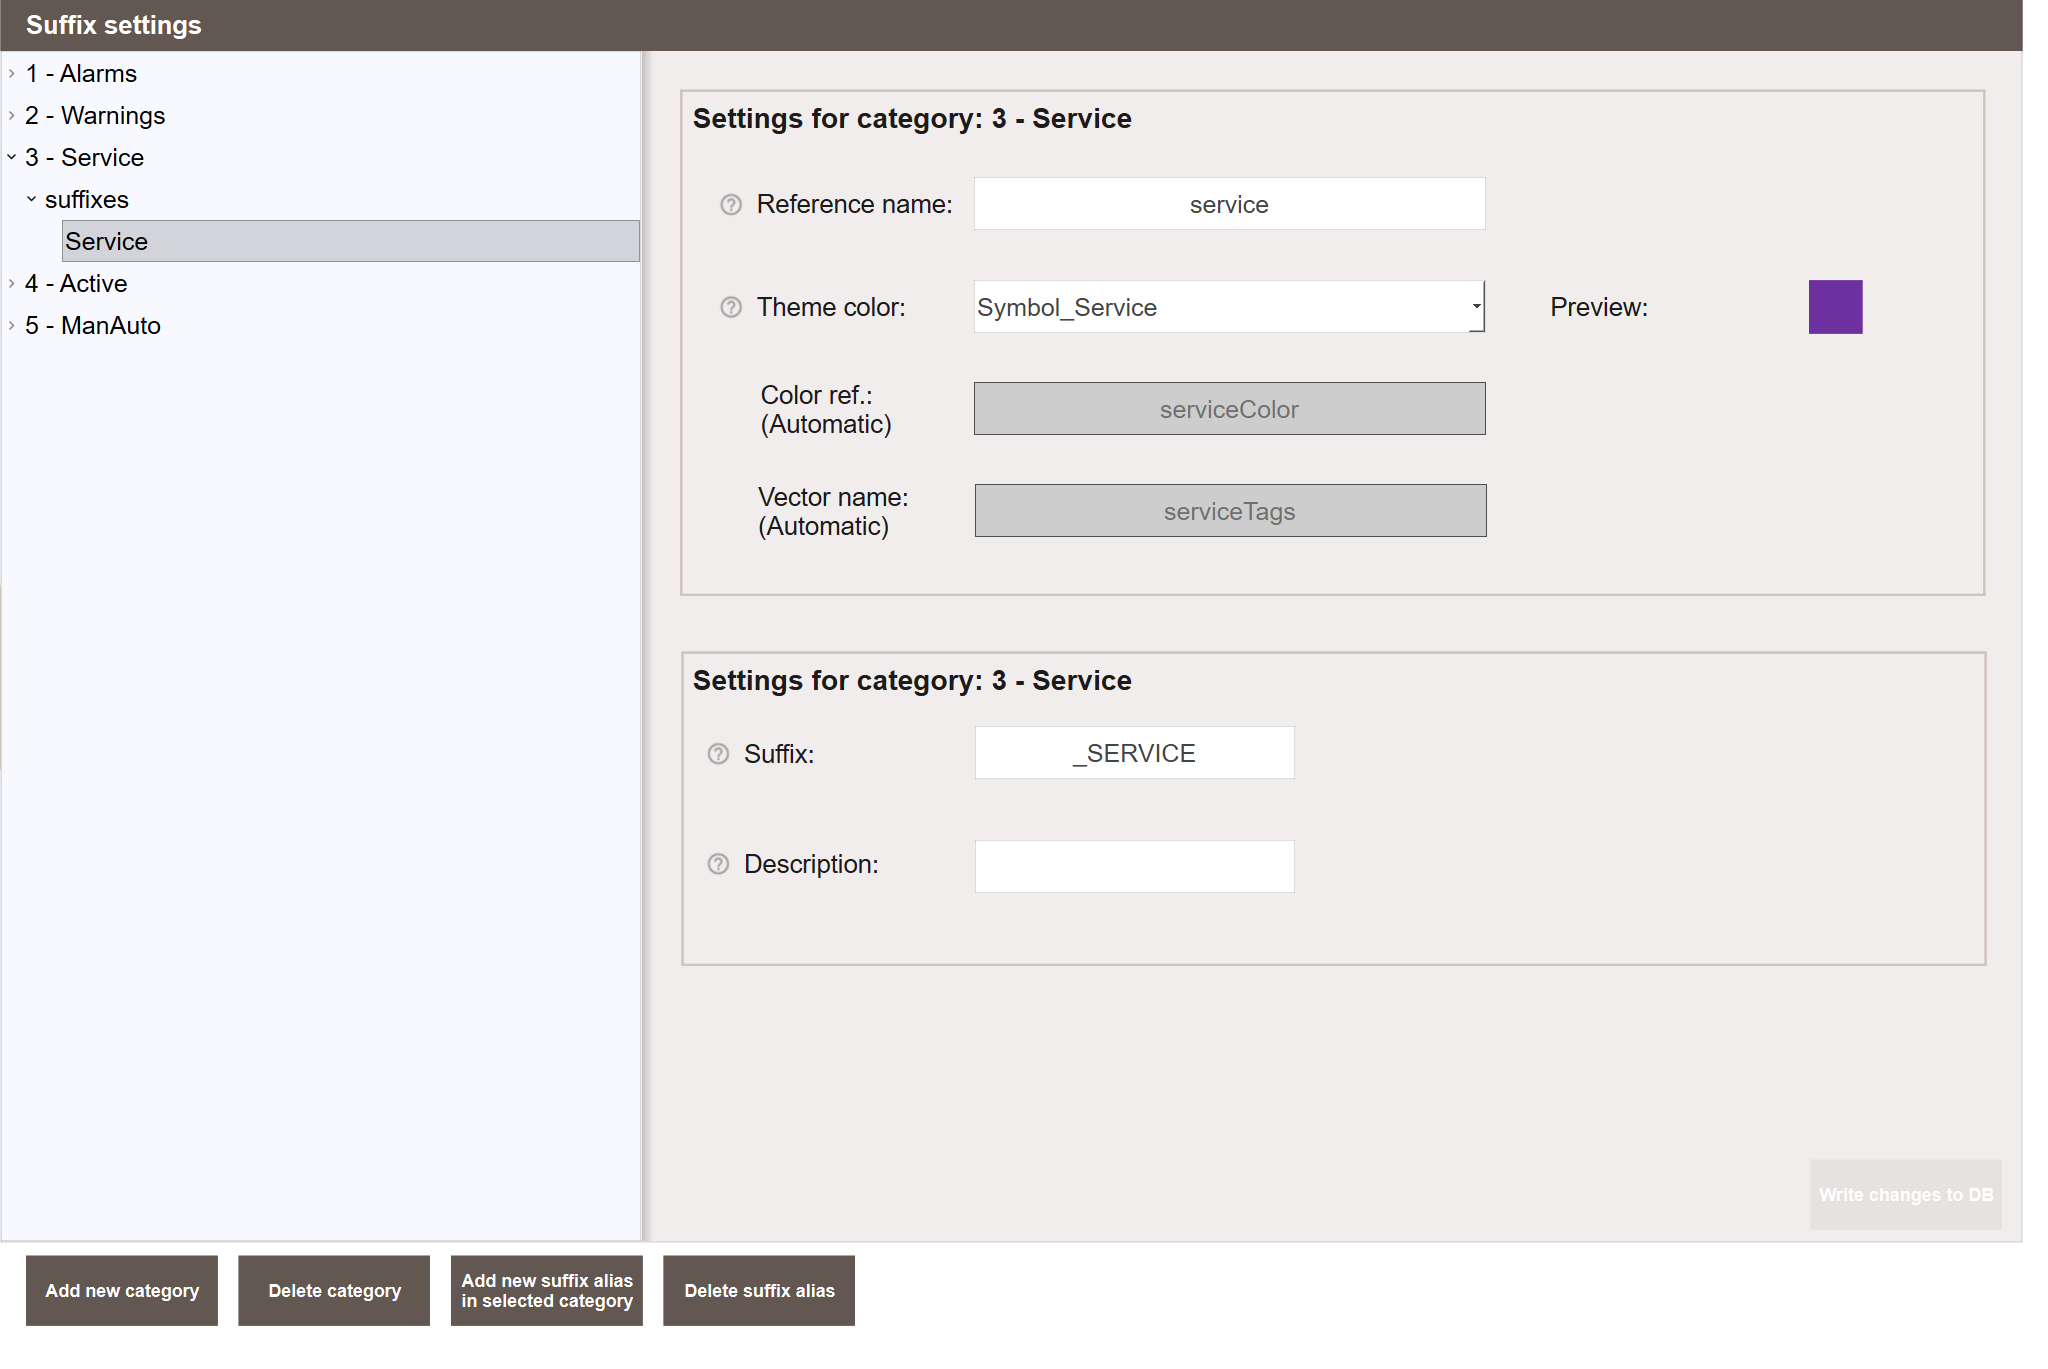
Selecting a group displays two settings panels on the right:
Settings for category — configures the group behaviour:
- Reference name — the name used in animation expressions, for example
alarmorwarning. This is used when building custom animated objects, see Creating custom animated objects. - Theme color — the color displayed when any suffix alias in this group is active. A color preview is shown to the right.
- Color ref. (Automatic) — automatically generated from the reference name. Does not need to be configured manually.
- Vector name (Automatic) — automatically generated from the reference name. Does not need to be configured manually.
Selecting a suffix alias within a group displays:
Settings for suffix — configures the selected suffix alias:
- Suffix — the actual tag suffix connected to this alias, for example
_LFor_LG. - Description — a human-readable description of what the suffix represents,
for example
Fault Alarm.
The default theme colors for each group are:
| Group | Theme color |
|---|---|
| 1 - Alarms | error |
| 2 - Warnings | Symbol_Warning |
| 3 - Service | Symbol_Service |
| 4 - Active | Symbol_Active |
| 5 - ManAuto | Symbol_ManAuto |
If no suffix aliases in any group are active, the object takes the color
Symbol_Default.
Adding suffix aliases to a group
To add a suffix alias to a group, select the group and click Add new suffix alias
in selected category. Give the alias a human-readable name such as Fault Alarm,
enter the actual tag suffix such as _LF, and add a description. Click
Write changes to DB to save.
Any object with a signal matching the configured suffix that becomes active will animate in the group color.
Adding custom groups
Additional groups can be added beyond the five defaults by clicking Add new
category. Give the group a Reference name, select a Theme color, and add
the relevant suffix aliases. The new group will be available as an animation state
on all objects that use the AnimationHandler() function in the
scWorkviewAnimation script.
Note
The Reference name of a custom group is what you use in animation
expressions when building custom objects. Choose a short lowercase name
without spaces, for example pressure or fault.
Creating custom animated objects
For integrators who want to build their own animated objects, the following explains how to connect a child object to an animation category.
Each child object that should respond to an animation category needs three things:
onLoad script — saves the object's original colors so they can be restored when no category is active:
this.defaultColor = System.themes.color("background");
this.defaultpColor = this.pen.color;
Visibility expression — shows the object only when the category is active:
Color expression — sets the color based on the active category, falling back to the default color when inactive:
if (this.animation.alarm) {
    return scWorkviewAnimation.alarmColor;
} else {
    return this.defaultColor
}
Replace alarm with the relevant category name. The available category names are:
| Category | Name |
|---|---|
| Alarms | alarm |
| Warnings | warning |
| Service | service |
| Active | active |
| ManAuto | manauto |
Note
Custom categories added in runtime are also available here. Use the category name as defined in Settings → Suffix → Suffix - Alarms.
Tip
The easiest way to create a custom animated object is to copy an existing animated object from the standard object libraries and modify it. This ensures all expressions and scripts are already in place.
Example - Building a custom animated motor object
This example walks through building a simple custom motor object that responds to four animation categories — alarm, warning, service, and active. It also demonstrates how to add service animation, which is not included in the standard object libraries by default.
Step 1 - Verify the suffix configuration
Before building the object, verify that all four animation categories used in this example are configured in Settings → Suffix → Suffix - Alarms. Categories 1, 2 and 4 should already be configured by default — expand each and confirm that suffix aliases connected to the relevant suffixes are present under suffixes:
- 1 - Alarms — should contain suffix aliases connected to alarm suffixes such as
_LDor_LG - 2 - Warnings — should contain suffix aliases connected to warning suffixes such as
_LM - 4 - Active — should contain suffix aliases connected to active suffixes such as
_IT
Category 3 requires manual setup since the _SERVICE suffix is not included by
default. Expand 3 - Service and check whether _SERVICE appears under
suffixes. If it is not there, click Add new suffix alias in selected category,
enter _SERVICE as the suffix and give it a description that fits your needs.
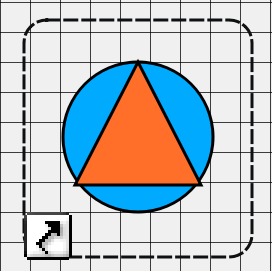
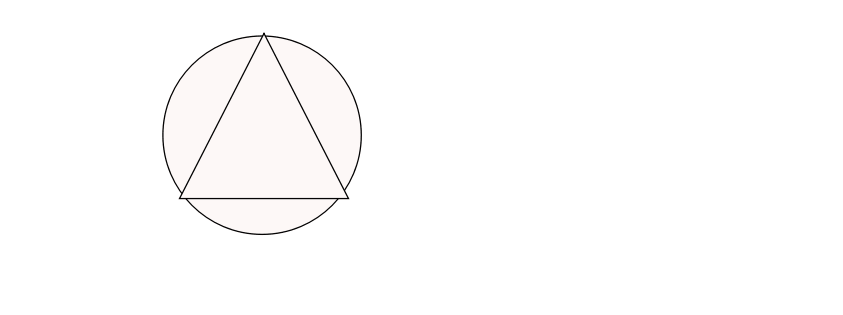
Step 2 - Create the visual elements
In WideQuick Designer®, create the following objects:
- A circle — this will blink in the alarm, warning, or service color when any of those categories are active.
- A triangle — its outline will change color when the active category is active.
- A
DynTouchobject — this binds the animation to the tag.
Step 3 - Add the onLoad scripts
Add the following onLoad script to the circle:
Add the following onLoad script to the triangle:
this.brush.color1 = System.themes.color("background");
this.defaultpColor = this.pen.color;
These scripts save the original colors of each object so they can be restored when no animation category is active.

Note
Since the triangle's brush color is not driven by any animation expression, it is set to the theme background color on load. This ensures the fill follows the active theme rather than being hardcoded to a specific color.
Step 4 - Add the color expressions
Circle — brush color:
Add the following expression to the brush color dynamic of the circle. The circle blinks in the color of the highest priority active category:
if (this.animation.alarm && _sys_pulse_1_Hz) {
    return scWorkviewAnimation.alarmColor;
} else if (this.animation.warning && _sys_pulse_1_Hz) {
    return scWorkviewAnimation.warningColor;
} else if (this.animation.service && _sys_pulse_1_Hz) {
    return scWorkviewAnimation.serviceColor;
} else {
    return this.defaultColor
}
The gif below shows where to add this expression:

Triangle — pen color:
Add the following expression to the pen color dynamic of the triangle. The triangle outline changes color when the active category is active:
if (this.animation.active) {
    return scWorkviewAnimation.activeColor;
} else {
    return this.defaultpColor
}
The gif below shows where to add this expression:
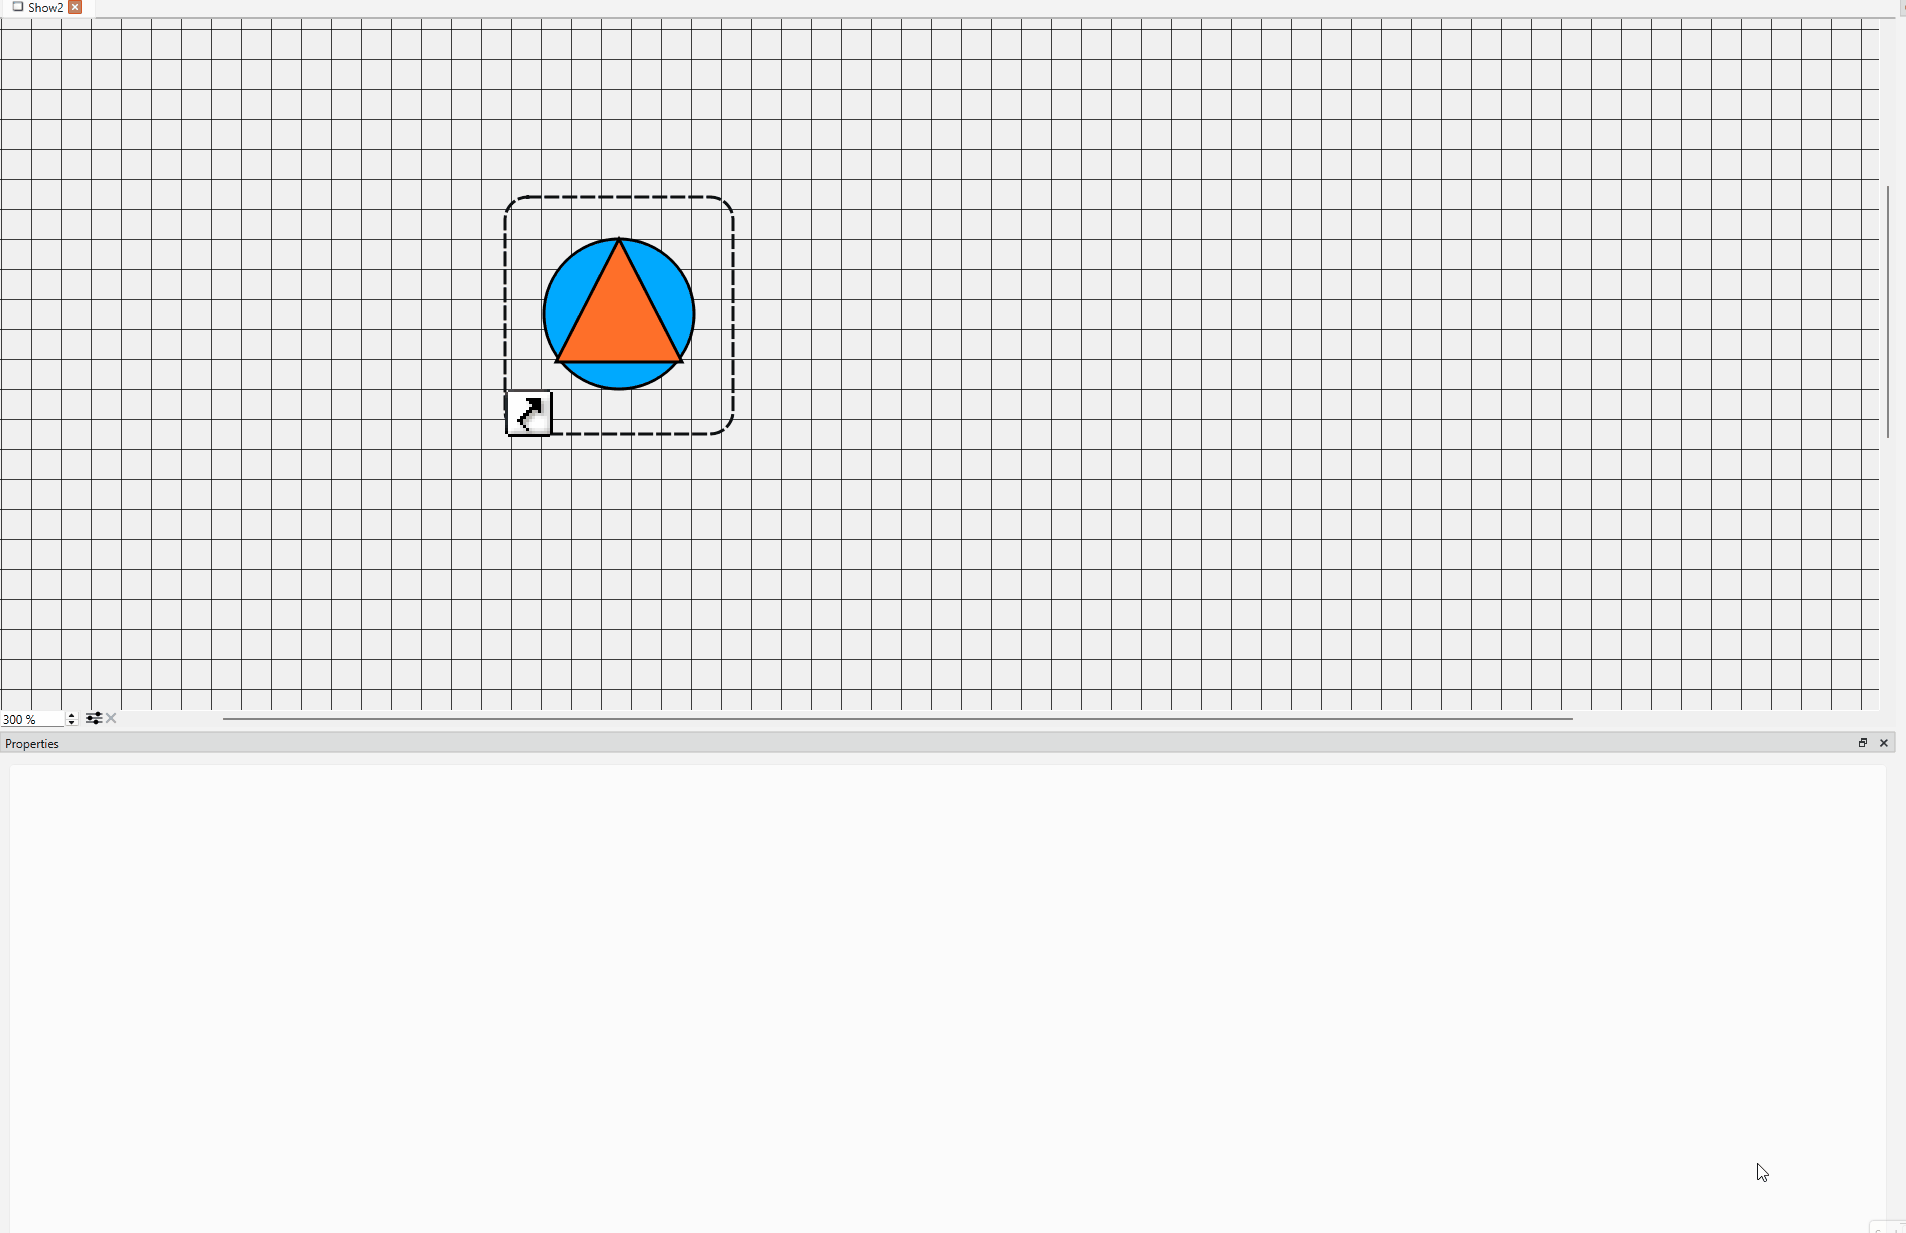
Step 5 - Group the objects
Before grouping, configure the DynTouch object properties to connect it to the
correct tag. In the Properties tab, enter the following:
- Connection — the connection name, for example
MB - Device — the device name, for example
AS01 - Sys — the system name, for example
VS10 - ObjectName — the object name, for example
PV01
These four properties combine to form the tag name MB.AS01_VS10_PV01, which the AnimationHandler() function in the scWorkviewAnimation script uses
to find all signals matching the configured suffixes.
Once the properties are filled in, select the circle, triangle, and DynTouch
object and press Ctrl+G to group them. The animation state will automatically
be shared with all child objects in the group.
Note
The Connection, Device, and Sys properties can also be set on the
Workview properties instead of on each DynTouch object individually. See
Tag Structure for more information.
Step 6 - Test in Runtime
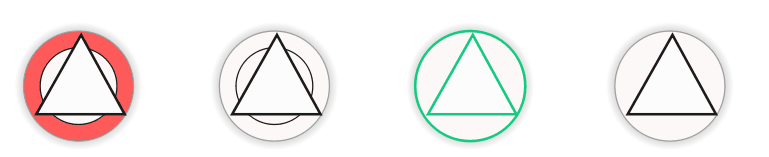
Start the project and verify that:
- The circle blinks red when a signal ending in an alarm suffix is active.
- The circle blinks yellow when a signal ending in a warning suffix is active.
- The circle blinks purple when a signal ending in
_SERVICEis active. - The triangle outline changes to the active color when a signal ending in an active suffix is active.
Tip
To test without a PLC connected, right-click the object in WideQuick Runtime®
to open the debug popup. From here the Data Store variables can be toggled between
true and false to verify the animations work as expected.