Maintenance - Configuring
Maintenance List
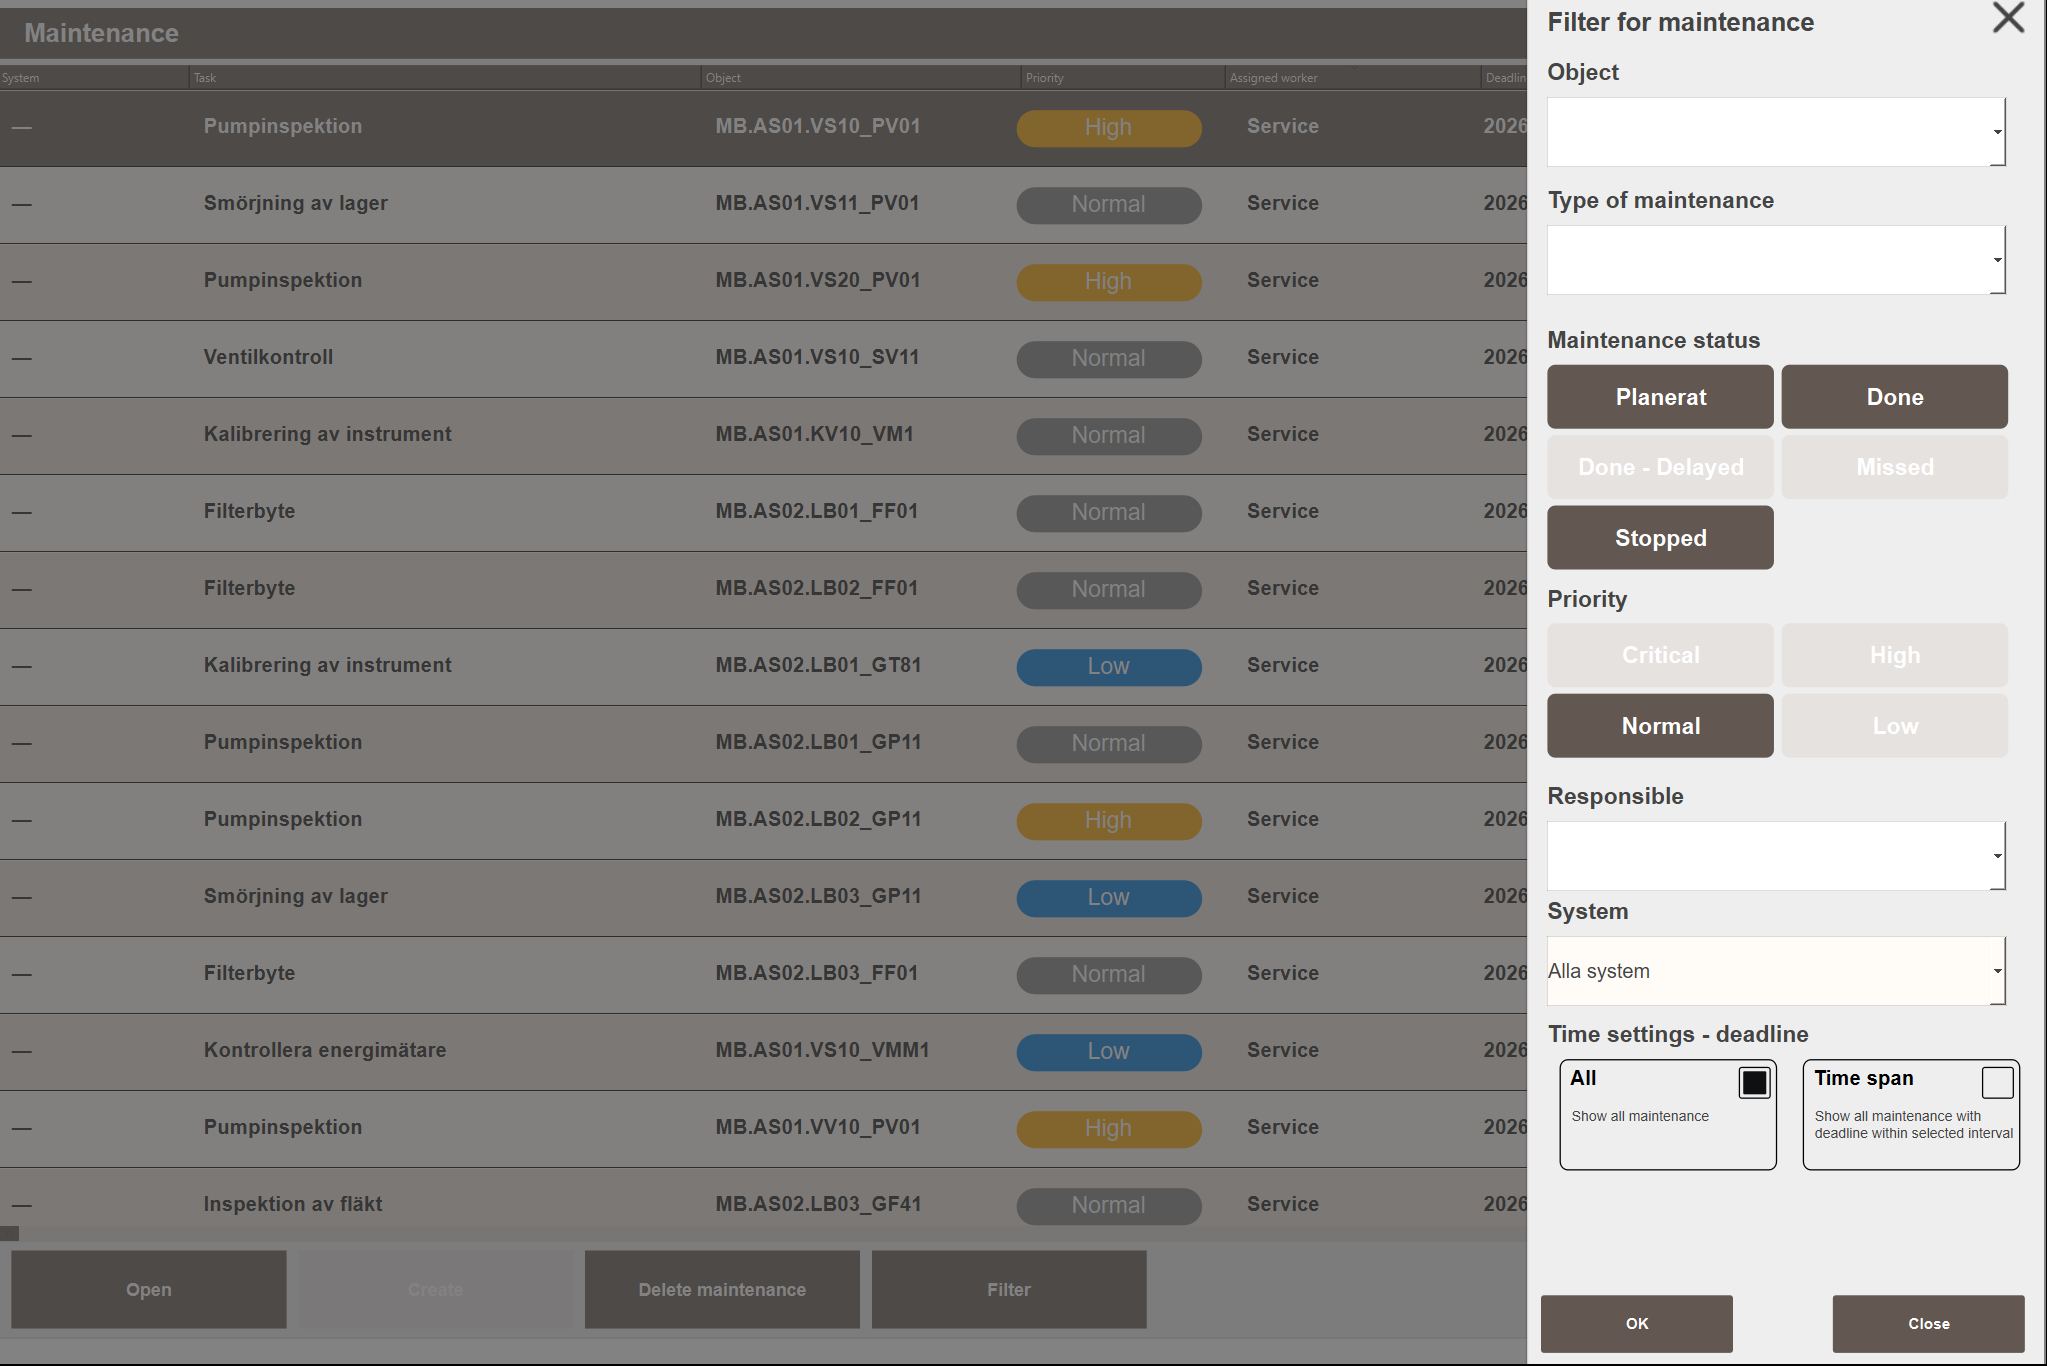
The Maint. - List view shows all maintenance tasks in the project in a single scrollable list. Selecting a task and clicking Open opens the task details where the deadline, description, status and assignee can be updated.
Tasks do not need to be tied to a tagged object. Leaving Object empty or typing a free-text name allows maintenance to be tracked for equipment that is not connected to the HMI.
Click Filter to open the filter panel:
- Object — filter by a specific object tag path.
- Type of maintenance — filter by maintenance type.
- Maintenance status — filter by one or more statuses: Planned, Done, Done - Delayed, Missed, Stopped.
- Priority — filter by one or more priority levels.
- Responsible — filter by assigned worker.
- System — filter to show only tasks belonging to a specific system.
- Time settings - deadline — show all tasks regardless of deadline (All), or limit to tasks with a deadline within a selected date range (Time span).
Templates
Templates allow frequently used maintenance types to be saved and reused. A template stores the maintenance type, priority, default deadline interval and description so that the same information does not need to be entered each time.
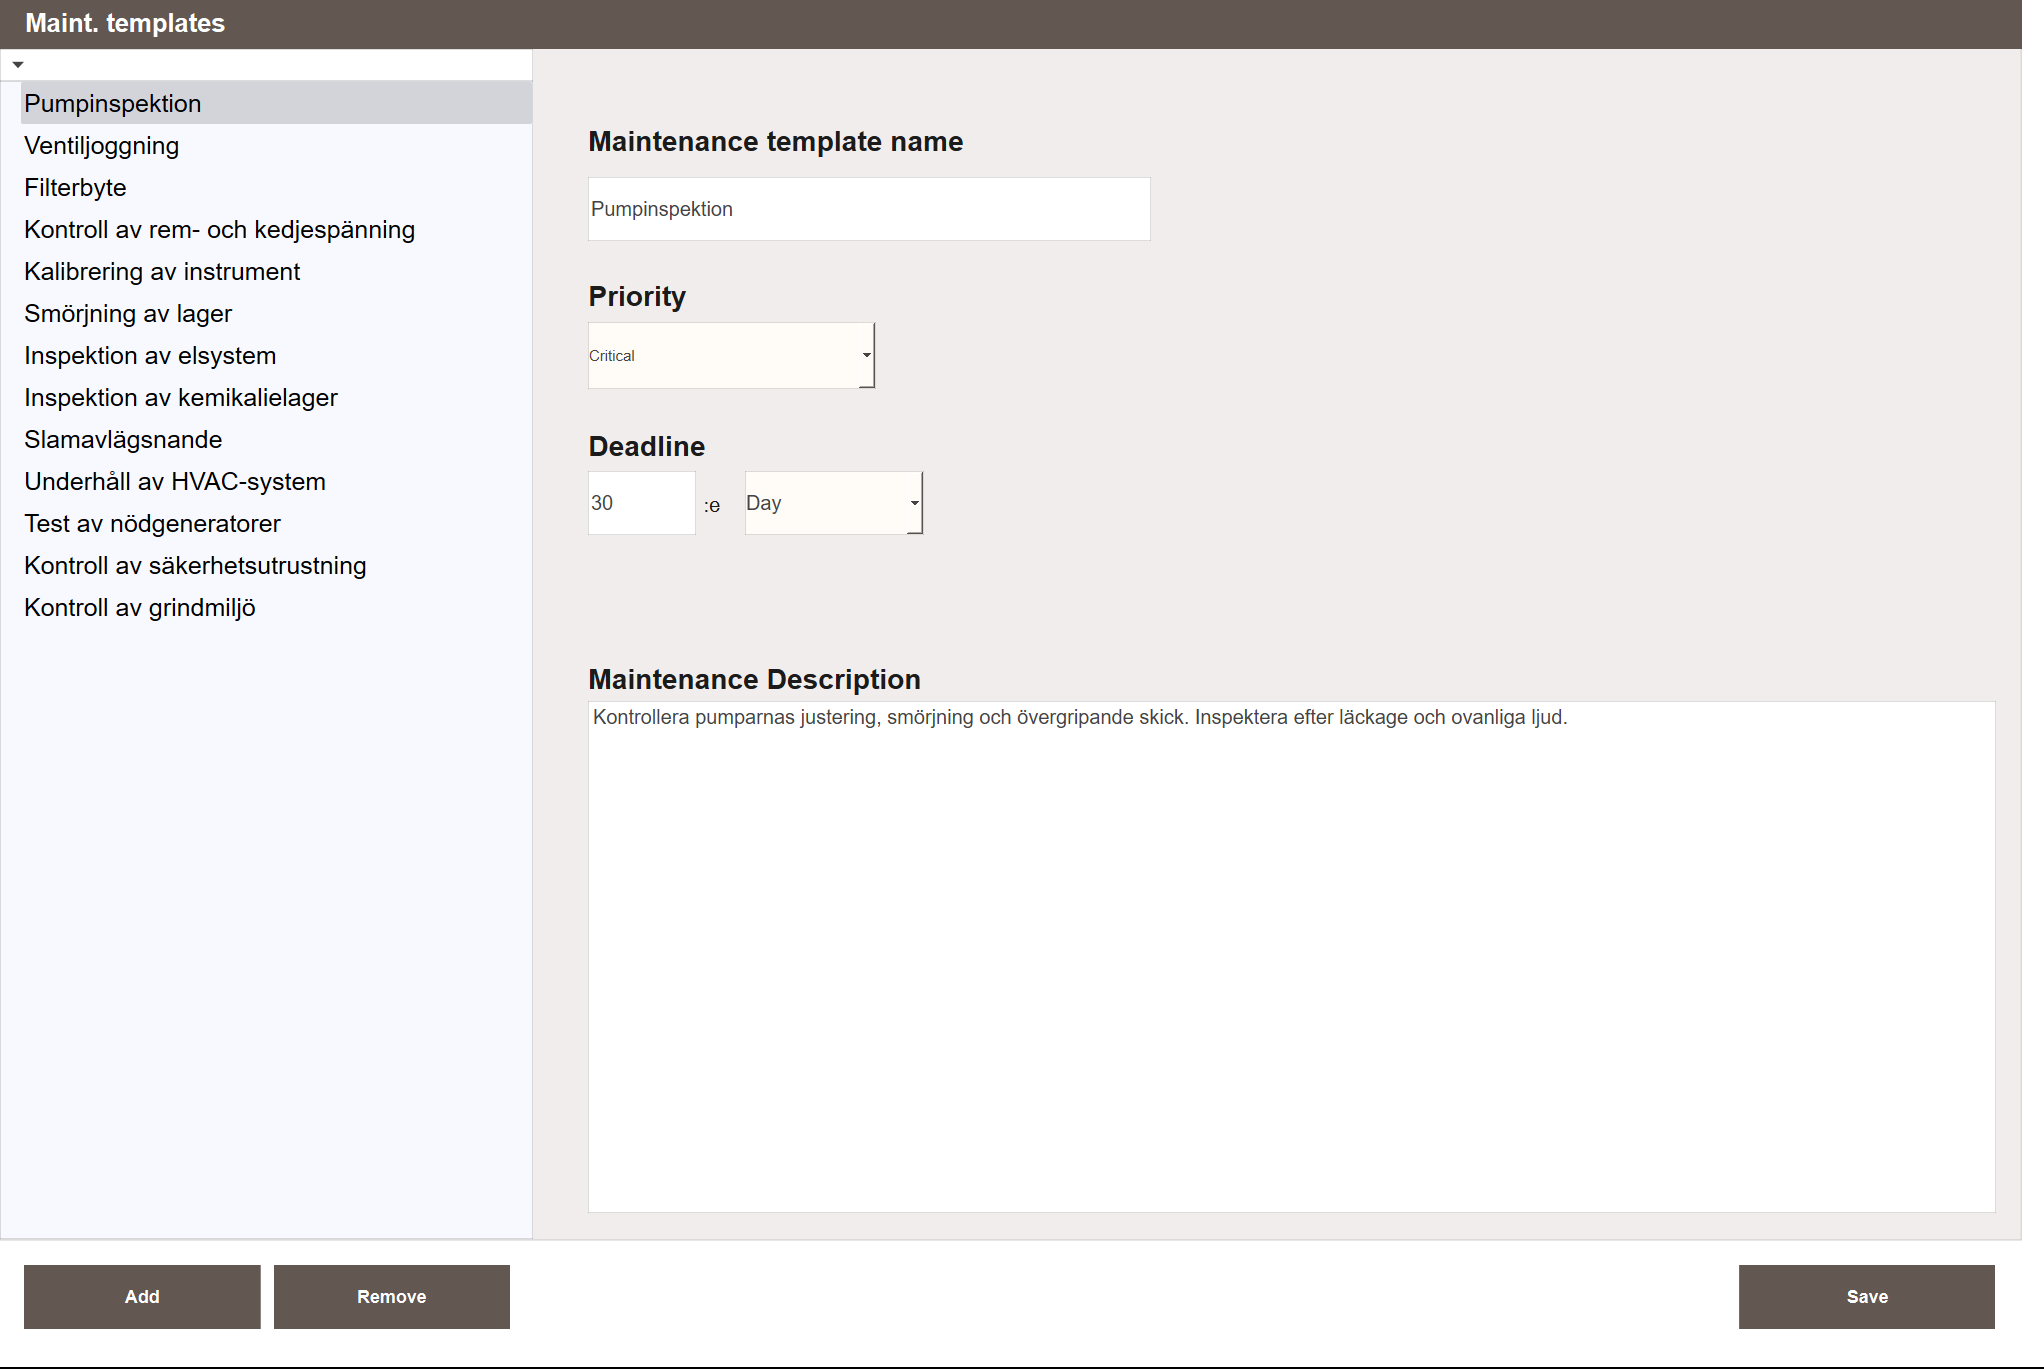
The left panel lists all templates. Selecting one shows its fields on the right:
- Maintenance template name — the name shown in the Type of Maintenance dropdown when creating a task.
- Priority — the default priority pre-filled when this template is selected.
- Deadline — a default deadline offset (number + unit: Day/Week/Month/Year) suggested when creating a task.
- Maintenance Description — a default description pre-filled on the task.
Creating a template:
- Navigate to Maintenance → Maint. - Templates.
- Click Add. A new entry appears in the list.
- Select the new entry and fill in the fields on the right.
- Click Save to save the template.
The template is now available in the Type of Maintenance dropdown when creating a task. All pre-filled fields can still be edited before saving. Editing the template does not affect tasks already created from it.
Recurring Maintenance
Recurring maintenance allows the system to automatically generate maintenance tasks on a fixed schedule. Instead of manually creating the same task every month or quarter, a configuration is set up once and the system handles the rest.
Each configuration defines:
- Which objects the maintenance applies to (one or more)
- The maintenance type and description
- The repeat interval — how often the task recurs
- The repeat rule — how the next deadline is calculated
- Whether missed tasks should automatically generate a follow-up
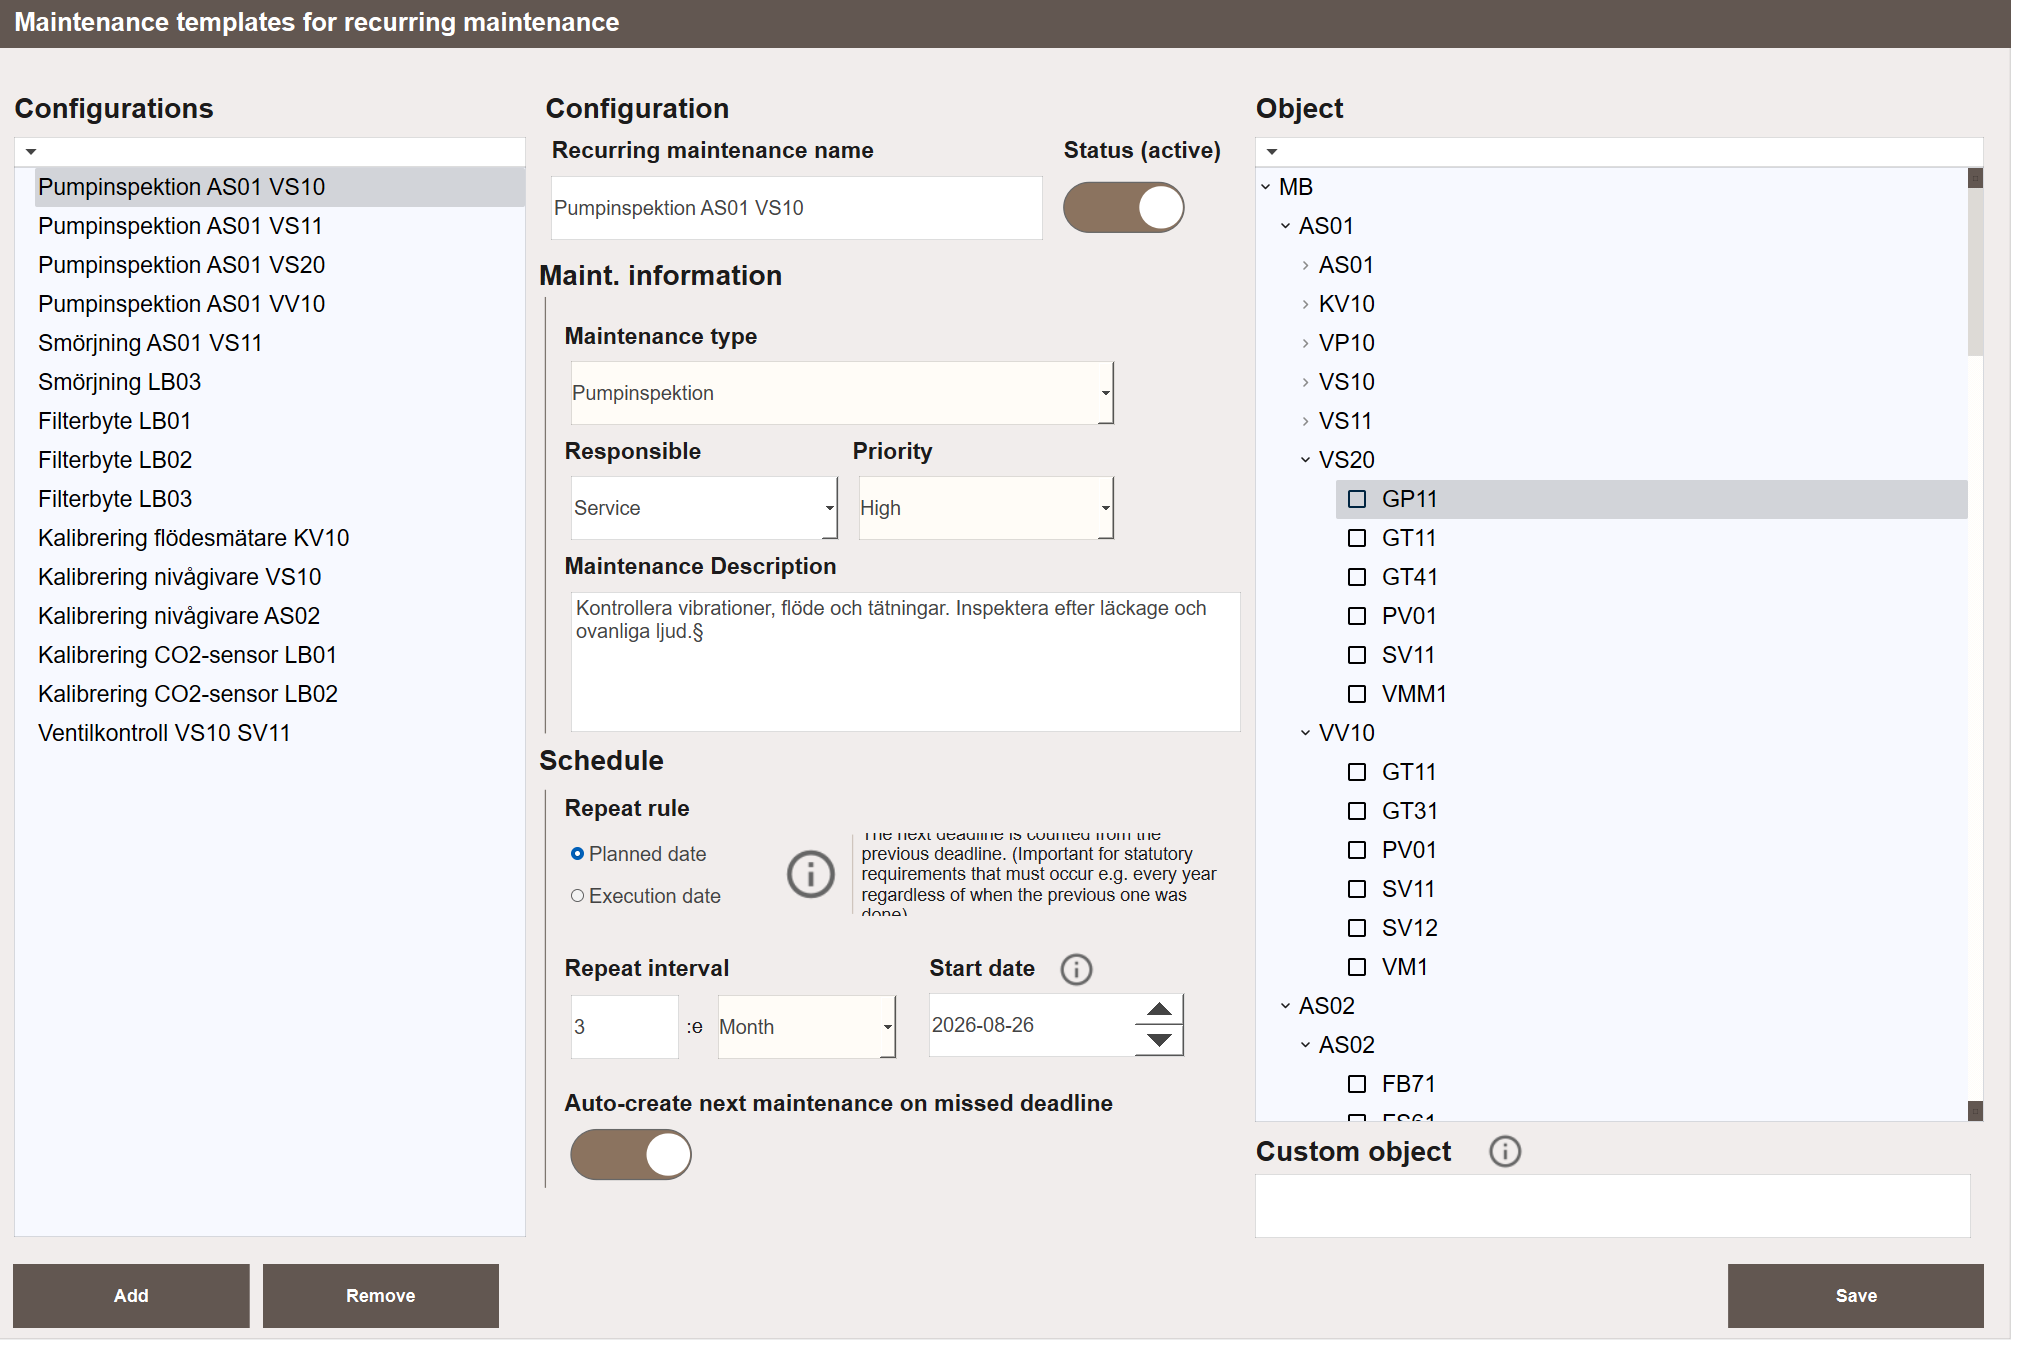
The view has three panels. The left panel lists all configurations. The middle panel shows the settings for the selected configuration. The right panel is an object tree where the objects this configuration applies to are selected. For equipment that has no tag in the system, use the Custom object free-text field at the bottom of the object panel to enter a name manually.
Creating a configuration:
- Navigate to Maintenance → Maintenance - Recurring.
- Click Add. A new configuration appears in the list.
- Enter a name in the Recurring maintenance name field.
- Under Maint. information, set the Maintenance type, Responsible and Priority. Optionally add a description.
- Under Schedule, choose a Repeat rule: Planned date to keep a fixed rhythm, or Execution date to start the interval from when the task was completed.
- Set the Repeat interval — the number and unit (Day/Week/Month/Year).
- Set the Start date for the first task.
- In the Object panel on the right, check all objects this configuration should apply to.
- Optionally enable Auto-create next maintenance on missed deadline.
- Confirm that Status (active) is toggled on.
- Click Save. The first task is created immediately and appears in Maint. - List with the status Planned.
Repeat Interval
The repeat interval controls how often a new task is generated. The available units are:
| Unit | Description |
|---|---|
| Day | Every N days |
| Week | Every N weeks |
| Month | Every N months |
| Year | Every N years |
Repeat Rule
The repeat rule controls how the deadline of the next task is calculated when the current one is completed.
| Rule | Description |
|---|---|
| Planned date | Next deadline is calculated from the previous task's deadline, keeping a fixed rhythm regardless of when the task was actually completed. Use this for statutory requirements that must occur at fixed intervals. |
| Execution date | Next deadline is calculated from the moment the task was completed, so the interval always starts from the actual completion date. |
Auto-create on Missed Deadline
When Auto-create next maintenance on missed deadline is enabled, a missed task automatically triggers the creation of the next scheduled instance. This ensures that the schedule continues even if a task was not completed on time. The missed task itself remains in the list with status Missed and must be handled manually.
When disabled, the schedule stops if a task is missed. No new instance is created until the missed task is dealt with.
Completing a Recurring Task
When a recurring task is marked as complete, the system automatically creates the next instance based on the configuration. The completed task is given the status Done or Done - Delayed depending on whether it was completed before or after its deadline.
Status
| Status | Description |
|---|---|
| Planned | The task is active and has an upcoming deadline. |
| Missed | The deadline passed without the task being completed. Set automatically by the system. |
| Stopped | The task has been manually stopped and will not be worked on. |
| Done | The task was completed on or before the deadline. |
| Done - Delayed | The task was completed but after the deadline had passed. |
Note
Missed and Done - Delayed are set by the system and cannot be selected manually. When editing a task, only Planned, Done and Stopped are available as user-selectable statuses.
Tasks that appear in the Calendar module are color-coded by status. See Calendar — Configuring for the color reference.
Priority
Tasks can be assigned one of four priority levels:
| Priority | Description |
|---|---|
| Critical | Highest priority. For tasks that must not be delayed. |
| High | High priority. For important but non-critical tasks. |
| Normal | Default level for standard scheduled maintenance. |
| Low | Low priority. For tasks that can be deferred if needed. |
Next Steps
- Extending — calendar integration and troubleshooting