Create Popup
WideQuick Modular Framework is delivered with several pre-configured popups, such as history, trend and maintenance. It is also possible to create fully custom popups tailored to specific objects and workflows. This guide explains how to create a custom popup from scratch — from importing tags and configuring suffixes to building the view and connecting it to an object.
Before getting started, make sure you are familiar with the tag structure used in WideQuick Modular Framework. If not, see Tag Structure.
There are three steps involved in creating a custom popup:
- First, import the tags to display and control in the popup. See Import tags for more information.
- Secondly, configure the suffixes for the newly imported tags and connect them to the specific popup. See Configure popup for more information.
- Lastly, create the popup view. See Build popup for more information.
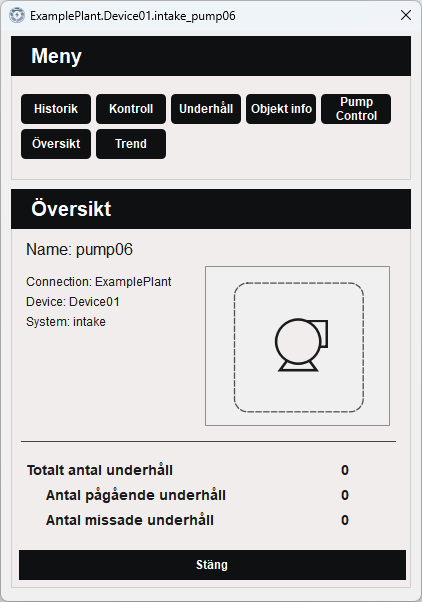
In this example we will build a popup for pump control. The pump will be called
pump06.
Import tags
The first step is to import the tags to display and control. These tags must follow the tag structure:
Connection.Device.Sys_objectName_suffix
The suffix can be whatever you want, but remember it for the next step where the popup will be configured. For more information on tag structure see Tag Structure.
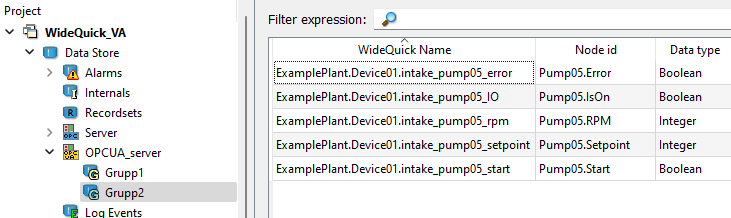
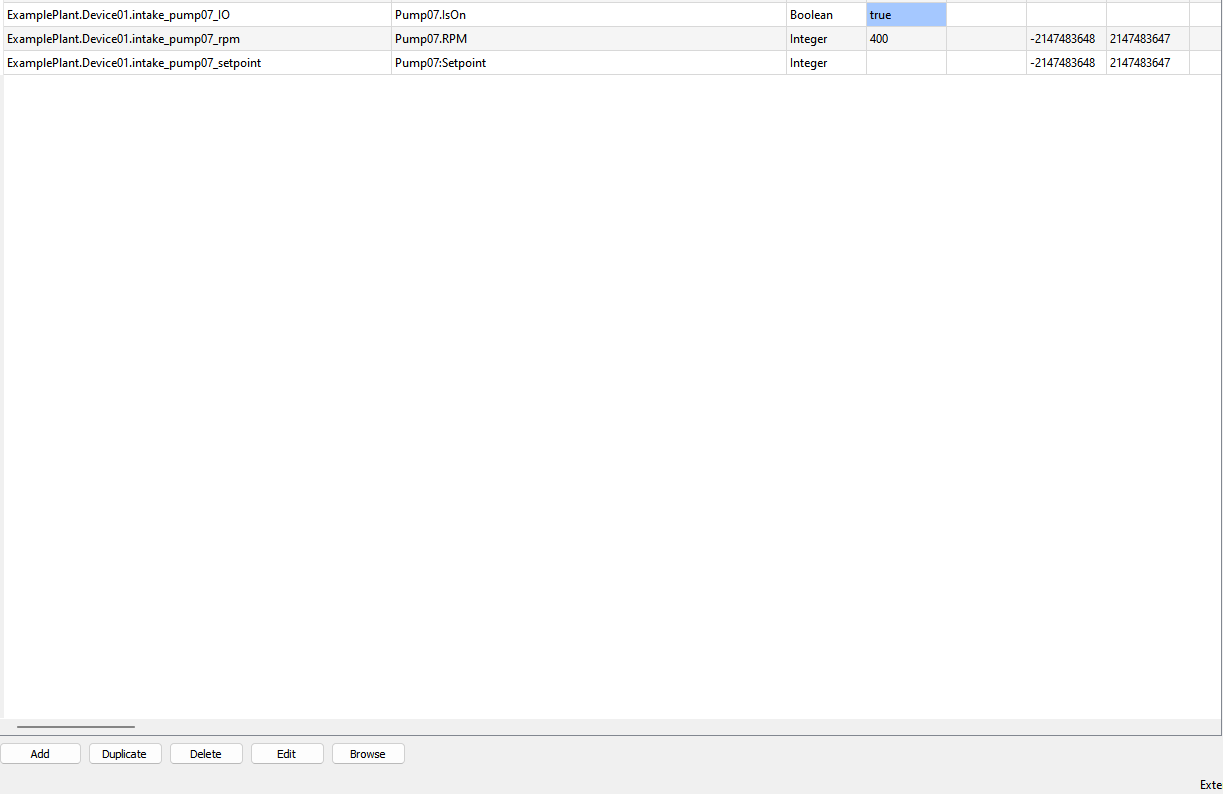
In this example we will import 5 tags from the PLC for controlling the pump:
- The first tag displays whether the pump is on or off. It will be given the suffix
_IO. This is a read-only tag in the PLC. - The second tag starts or stops the pump. It will be given the suffix
_start. This is a read/write tag in the PLC. - The third tag is the setpoint for the pump RPM. It will be given the suffix
_setpoint. This is a read/write tag in the PLC. - The fourth tag is the actual RPM of the pump. It will be given the suffix
_rpm. This is a read-only tag in the PLC. - The fifth tag is an error signal, active when the pump has encountered an error.
It will be given the suffix
_error. This is a read-only tag in the PLC.
Reusing tags
A tag can be displayed on several popups. It is not necessary to import the same tag multiple times.
Configure popup
Once the tags have been imported, the next step is to configure them and connect them to the popup. This is done in a few steps:
- Start the project.
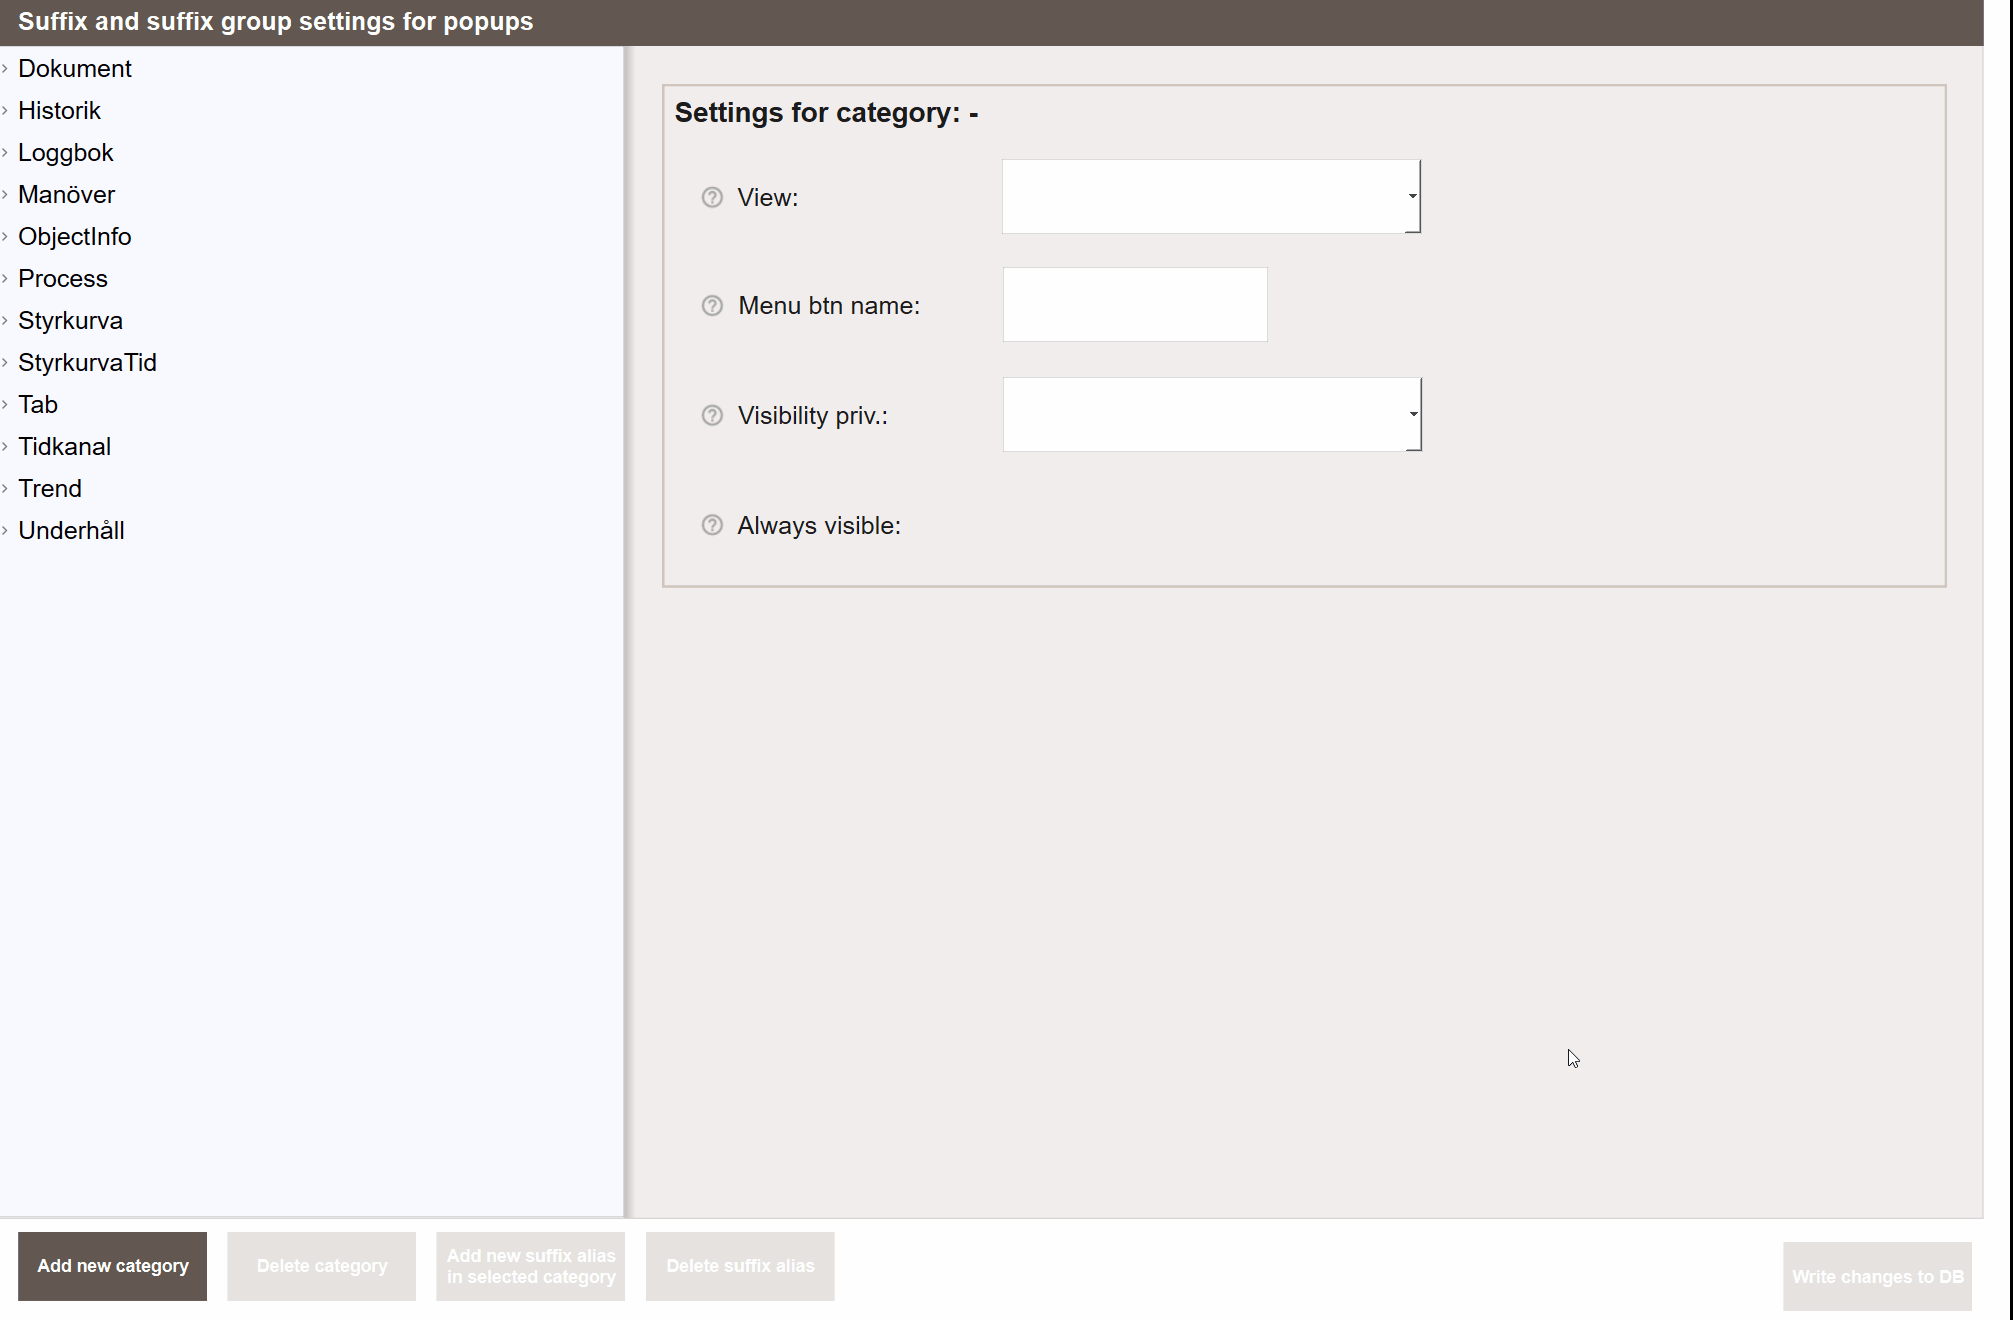
- Navigate to Settings → Suffix → Suffix Alias - Popups.

- Create a new suffix category by pressing Add new category and give the new category a name. Since we are creating a popup for pump control, name it Pump Control.
- Select the new category in the list and click Add new suffix alias in selected category. In this example we start with the tag with suffix
_IO, which displays whether the pump is on or not. Name this suffix Active.

- Fill in the relevant information for this suffix alias:
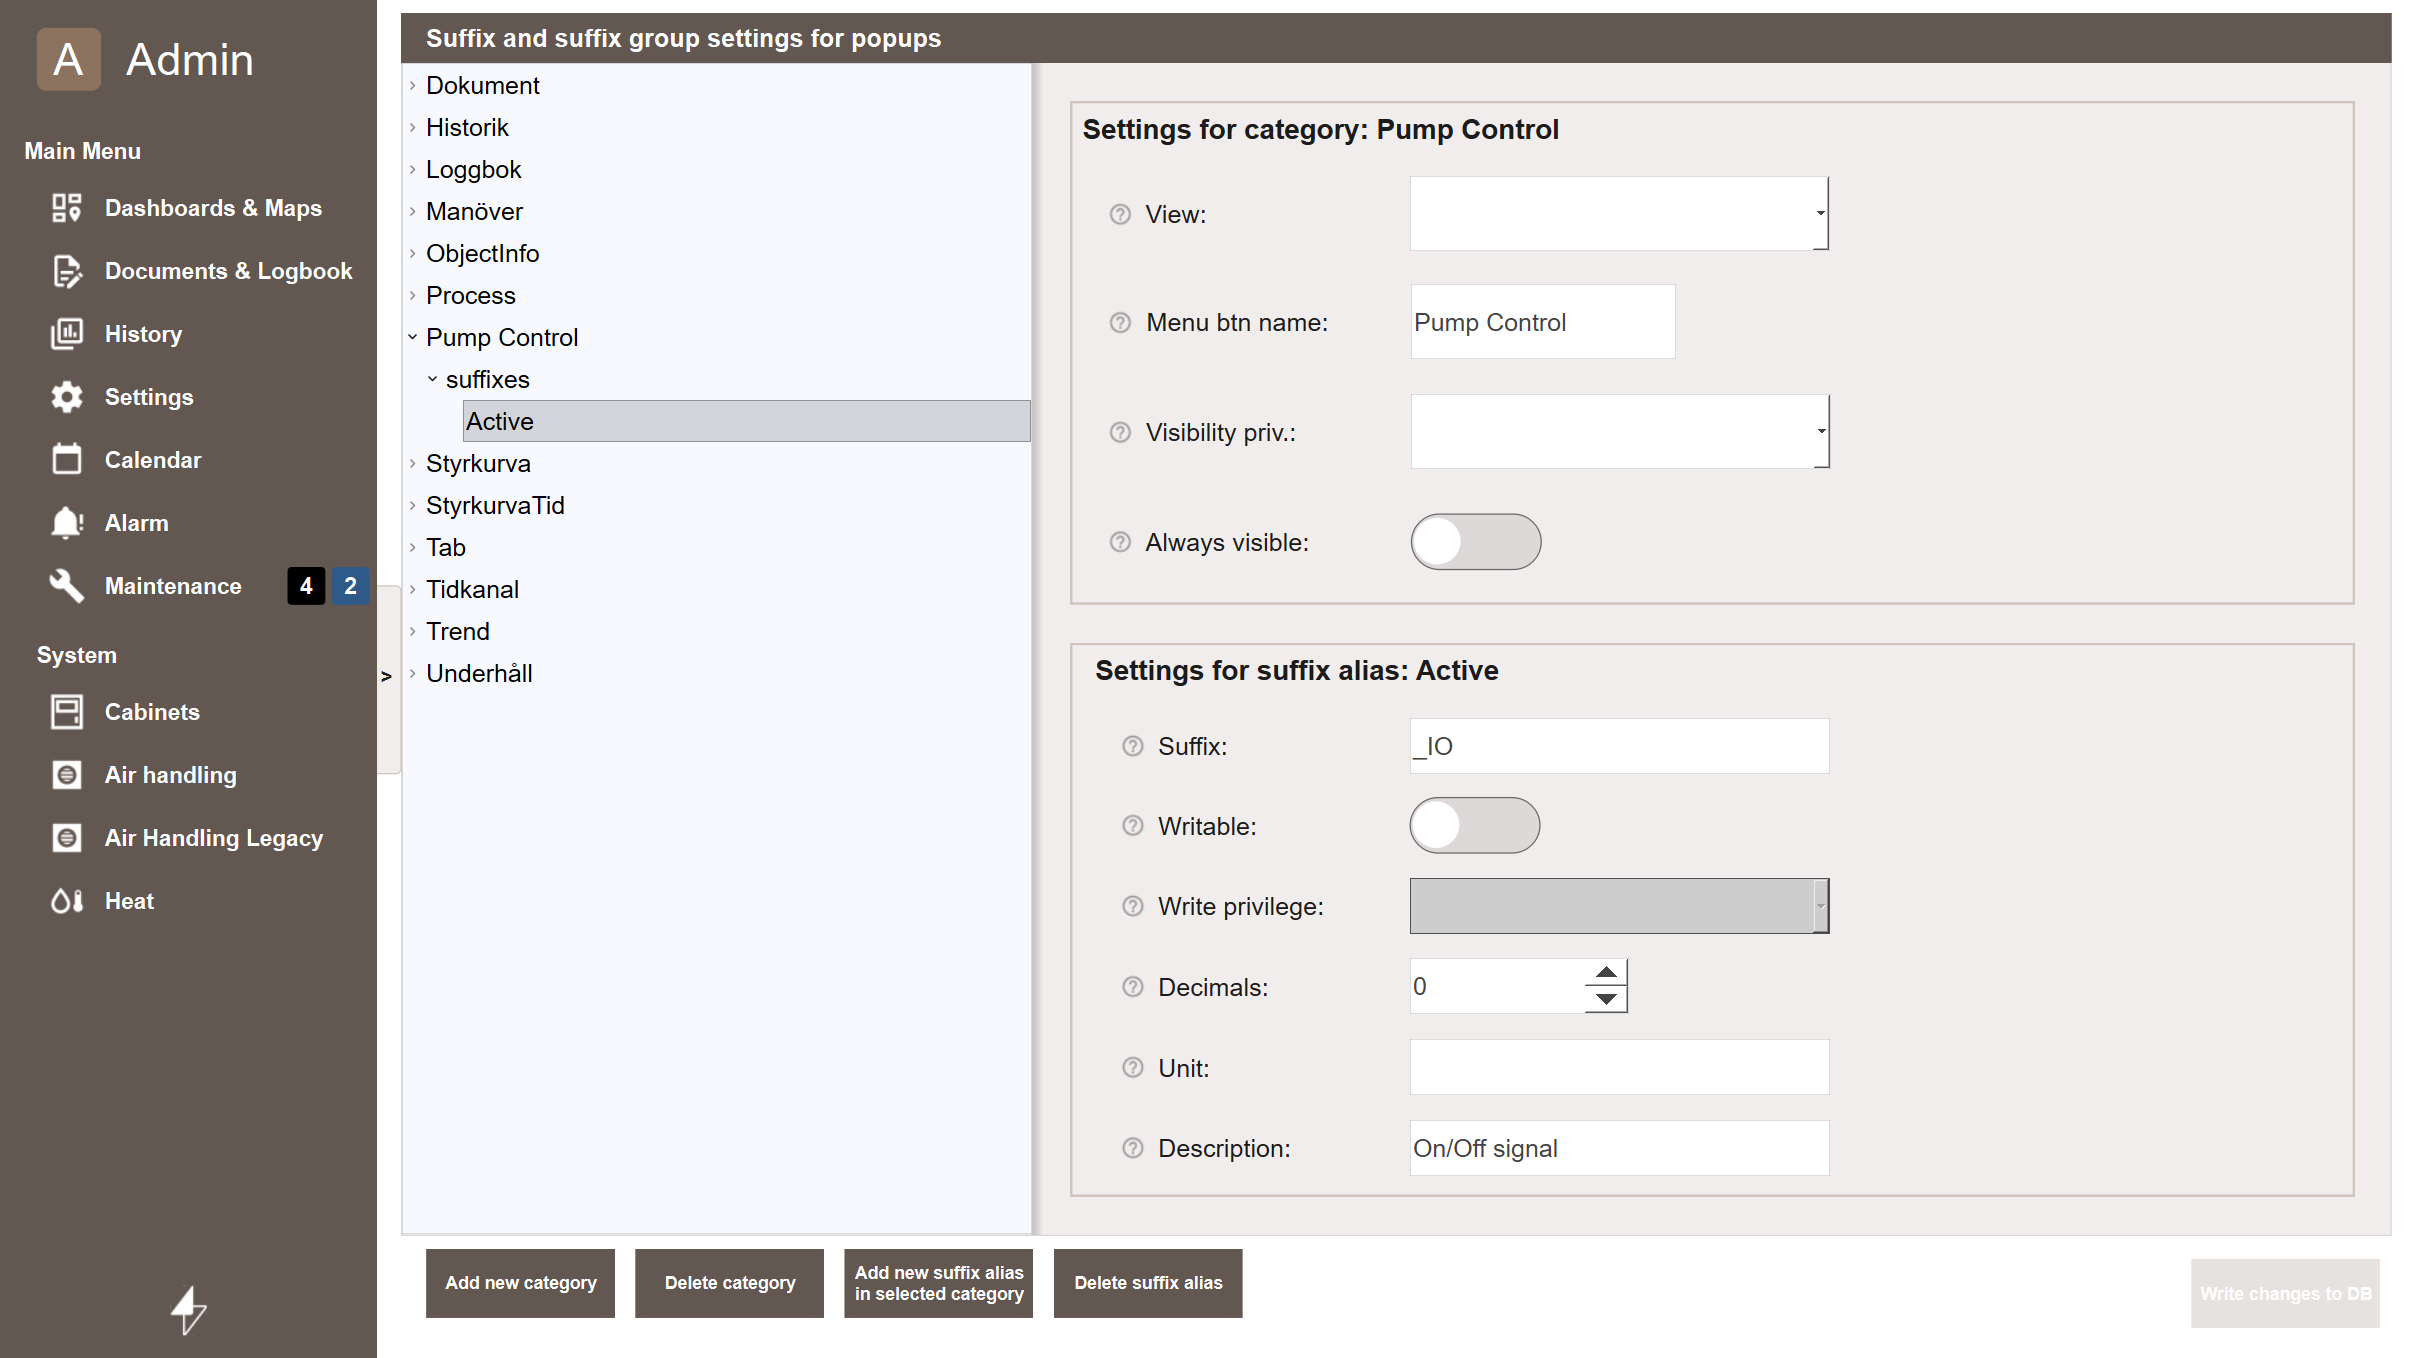
- Suffix — The suffix entered on the tag, in this case
_IO. - Writable — Leave disabled since this is a read-only tag in the PLC.
- Write privilege — Leave empty since this suffix is not writable.
- Decimals — Leave as is since this is a boolean signal with no decimals.
- Unit — Enter the unit for the suffix. Since this is a boolean no unit is needed.
- Description — A description of what this suffix represents. Since this is a
status signal, enter
On/Off signal.
Specific information per tag
It is possible to overwrite the write privilege, number of decimals, and the suffix description per tag by entering the information in the tag description. See Tag Structure for more information.
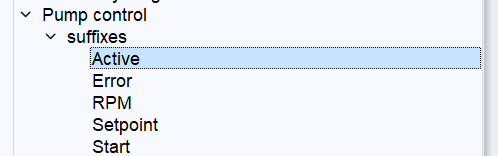
Repeat these steps for the four remaining tags. In this example the suffixes will be named as follows:
_setpoint— Setpoint_rpm— RPM_error— Error_start— Start
The finished list should look something like this:
Choosing a popup template
WideQuick Modular Framework includes three popup template sizes to choose from depending on the complexity of the popup and the amount of content to display:
| Template | Width | Use when |
|---|---|---|
| Template_Popup_Small | 490px | Simple popups with few rows |
| Template_Popup_Medium | 980px | More complex popups with more content |
| Template_Popup_Large | 1480px | Comprehensive popups with maximum content |
All three templates are found under Workviews → Templates. The buttons and layout scale automatically with the template size, so the process for building a popup is the same regardless of which template is chosen.
Tip
When in doubt, start with Template_Popup_Small. Since popups scale automatically based on available tags, a smaller template is often sufficient and results in a cleaner, more focused popup.
Build popup
The final step is to build the popup view for controlling the pump and displaying information.
There are two ways to approach this — start from a new Workview or copy an existing template view. The easiest approach is to start with the template view, which contains all the necessary scripts and configuration. Copy the Workview Template_Popup_Small found under Workviews → Templates and name the new Workview Pump Control.
Naming popups
The popup does not need to be named the same as the suffix group created in the previous step. This is just a coincidence in this example.
The view can now be built using objects from the CustomPopupObjects object library. This library contains objects for displaying and controlling tags. If a tag is not available for the object displaying the popup, the object will automatically be hidden and the popup rescaled to avoid blank space.
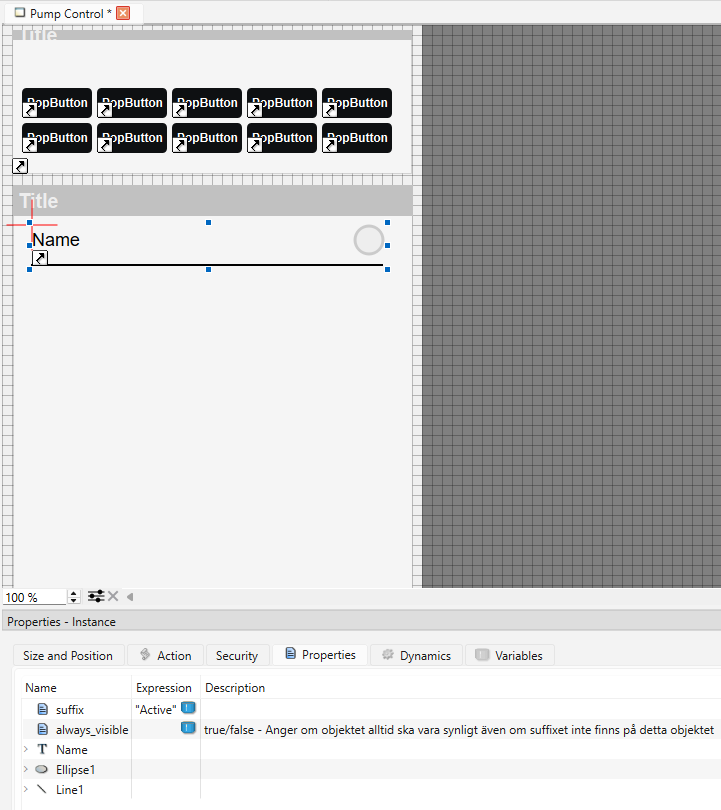
Start by adding an object to display whether the pump has been started. The
StatusRow object is ideal for this. Drag a StatusRow into the view, select it,
and open the Properties tab. Set the SuffixAlias property to Active to
connect this object to the suffix _IO:
Suffixes
The SuffixAlias on CustomPopupObjects refers to the name given to the
suffix in the previous step, not the actual suffix. In this example, enter
Active instead of _IO.
Next, add controls for starting and stopping the pump using the 2Button_row
object. One button for start and one for stop. In this example, setting _start
to 0 stops the pump and setting it to 1 starts it. Fill in the properties
accordingly:
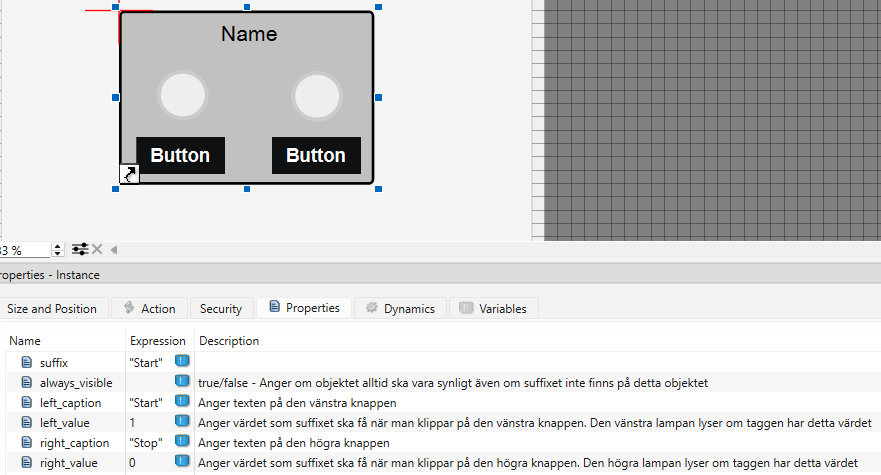
Next, add a row for setting the setpoint and another for displaying the actual RPM
using the ValueRow object. This object allows value entry if Writable was
enabled in the previous step, otherwise it displays the value read-only. Since
Writable was enabled for the setpoint but not the RPM, add two ValueRow
objects and set their SuffixAlias to Setpoint and RPM respectively.
Finally, add a StatusRow for displaying whether the pump has encountered an error.
The final view should look something like this:
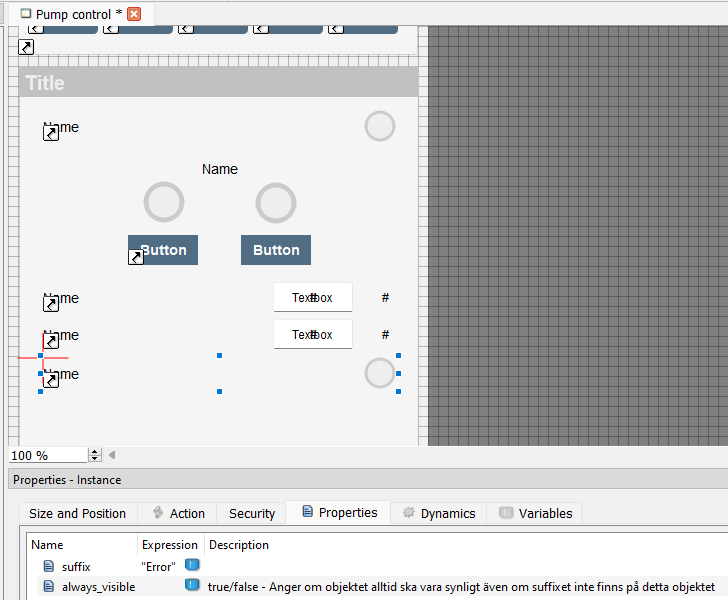
The last step is to resize the view to remove empty space at the bottom. Right-click
the view in the project tree and select Properties. Setting the height to
approximately 520 will ensure all objects are visible while removing the empty
space. The foreGroundBox2 object does not need to be resized as it rescales
automatically with the view.
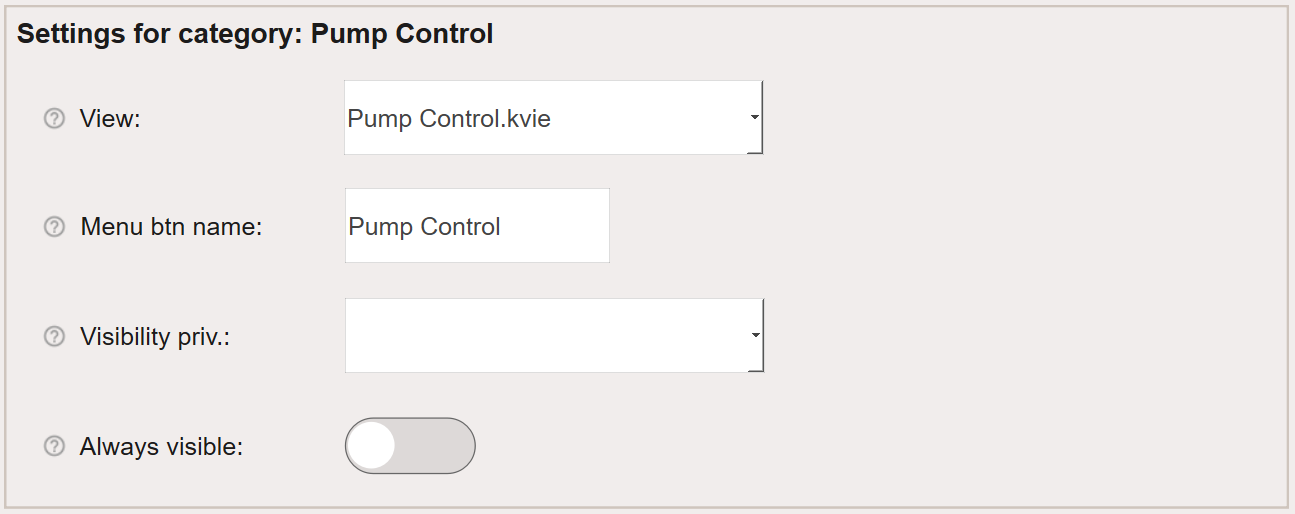
Start the application and navigate to Settings → Suffix → Suffix - Popups. Select Pump Control and update View to the newly created view Pump Control as shown below:
All that remains is to start the project and click on pump06 to see the Pump Control popup. See Create Object to create an object in a
Workview.

Automatic scaling
The content shown for an object is directly linked to which signals, tags, or variables are available for that object. When a popup is loaded, the view is automatically resized and all rows in the custom popup that are not relevant for the linked object are hidden.
Automatic Scaling
More information about Automatic Scaling can be found here.
To illustrate this, a second pump called pump07 will be added. This pump has the
same signals as pump06 except it does not have an error tag (_error).
When pump07 is clicked, the popup will automatically hide the error status row
and rescale to remove the blank space:
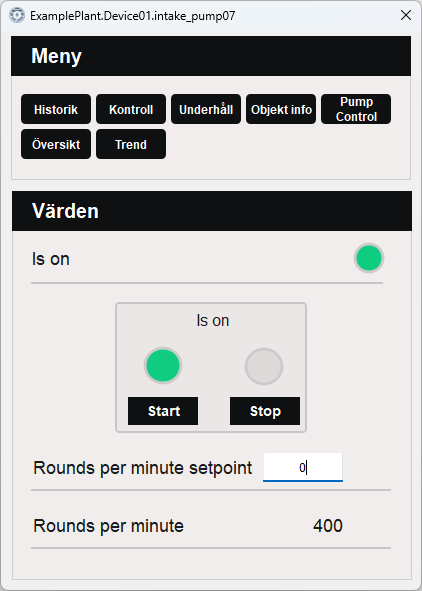
Because of this feature, popups should always be built to show the maximum number of tags — the worst case scenario — and will then automatically rescale according to the actual number of tags available for the object.
Opening a popup
The following section covers the two ways a popup can be opened in WideQuick.
The opening method is determined by how the DynTouch object is configured in
WideQuick Designer®.
There are two ways to open a popup in WideQuick, each with a different visual behaviour:
-
app.popOut— Opens the popup as a sidebar within the current view. The rest of the view is shaded, keeping the user in context while focusing attention on the popup. This is the default behaviour for most built-in popups. -
view.link— Opens the popup as a floating window on top of the current view, similar to a traditional dialog. This is useful when the popup content needs more visual separation from the underlying view.

Tip
Use app.popOut for most popups — it keeps the user oriented within the
current view. Use view.link when the popup content is complex enough to
warrant full visual separation from the underlying view.
Opening a specific popup directly
By default, clicking a DynTouch object opens the tab navigation first, allowing
the user to select which popup to view. In cases where users frequently navigate
to a specific popup — such as Manover — it is possible to bypass the tab
navigation and open that popup directly.
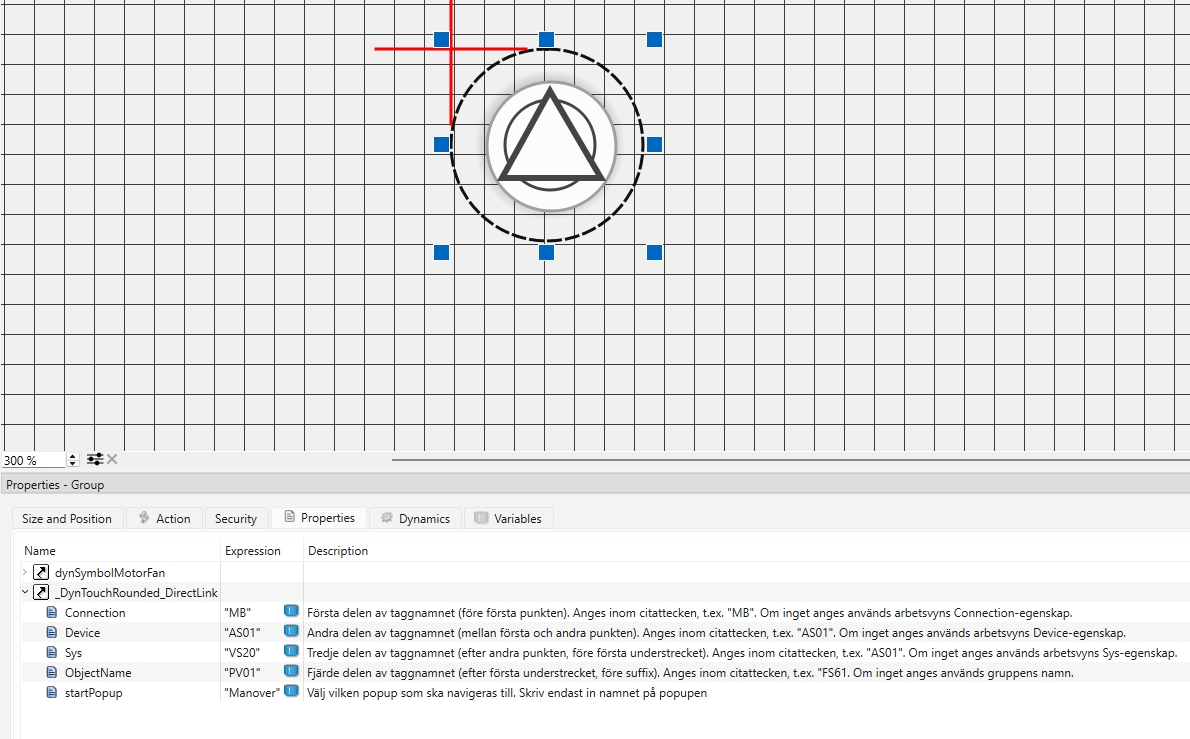
This is done by using the _DynTouch_DirectLink or _DynTouchRounded_DirectLink
objects instead of the regular DynTouch object. These are found in the same
object library as the regular DynTouch object.
To configure a direct link, set the startPopup property on the object to the name of the popup that should open on click:
Tip
Use _DynTouch_DirectLink when users frequently navigate to a specific popup
tab. This saves an extra click and improves the workflow for operators who
regularly interact with the same popup.