Send SMS with Teltonika – Advanced
Certificate valid for the router's IP address
As an alternative to SetIgnoreCertificateErrors(true) (see Usage), it is possible to create a certificate that the router actually trusts for its IP address, and then trust that certificate on the server computer running WideQuick. This avoids disabling certificate validation entirely.
A public certificate authority (CA), such as Let's Encrypt, never issues certificates for private IP addresses (RFC 1918, e.g. 192.168.1.1). The Teltonika router does, however, have its own built-in CA (uhttpd.crt / uhttpd.key – the same CA the router's own web interface is signed with) that can sign a certificate with the IP address included as a Subject Alternative Name (SAN). The certificate is created in two steps: first a certificate signing request (CSR) is generated, which is then signed separately with the router's IP address given as SAN.
1. Create a certificate signing request (CSR)
-
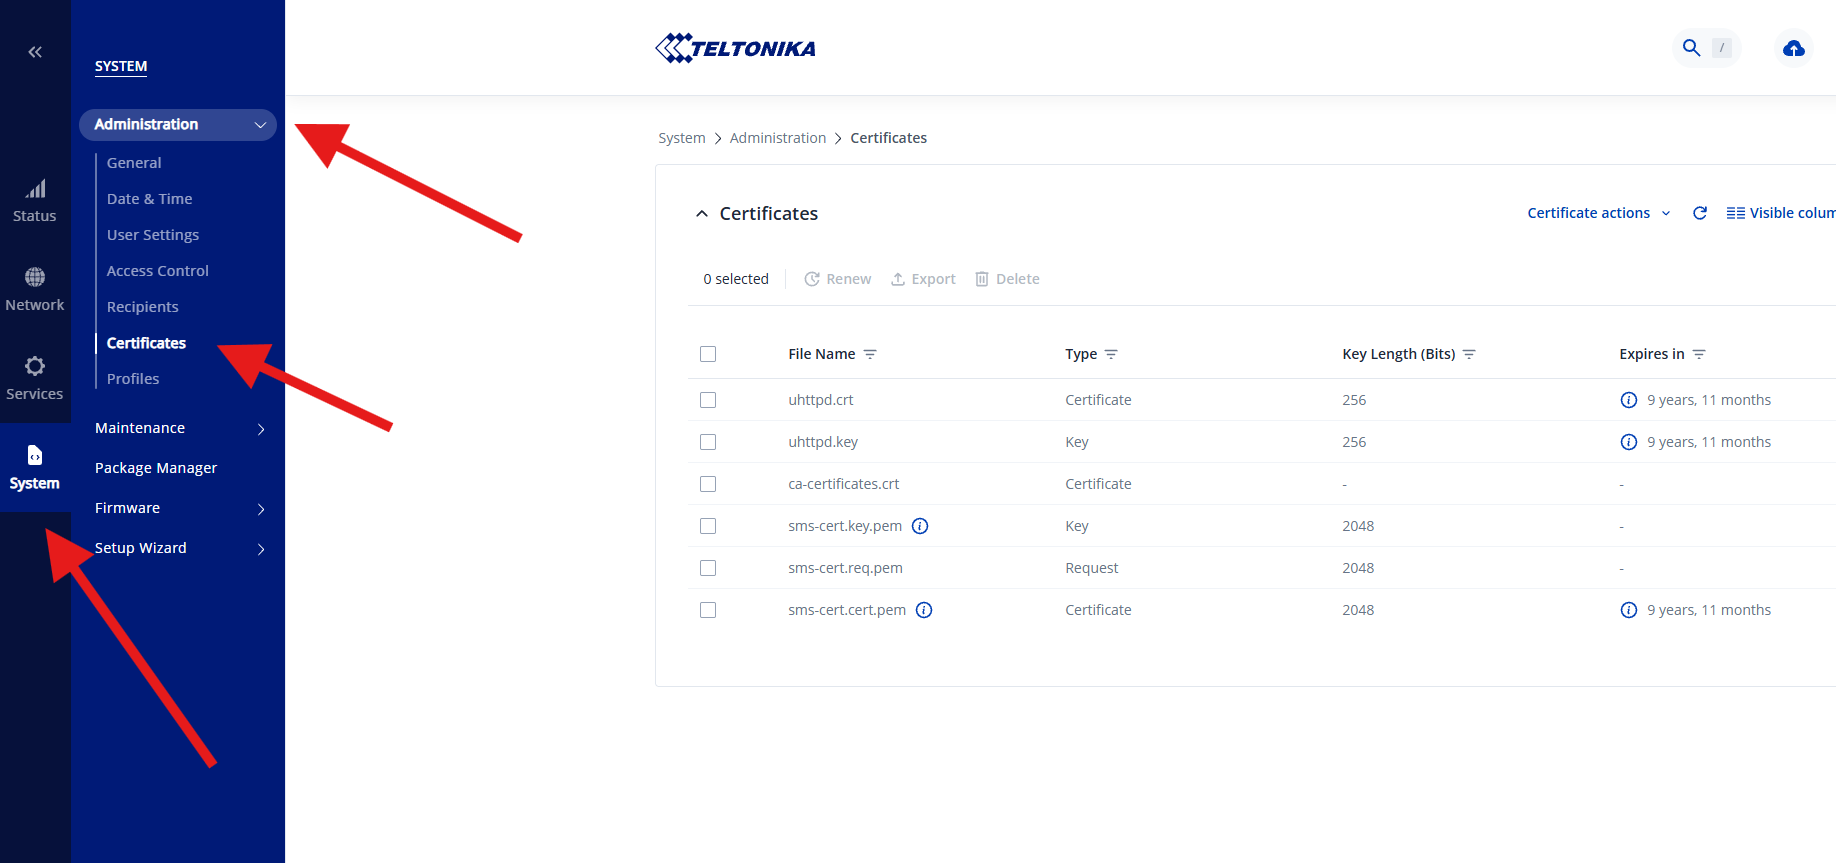
Go to Certificates in the router's admin interface (System → Administration → Certificates) and click Create.
-
Fill in the form as follows:
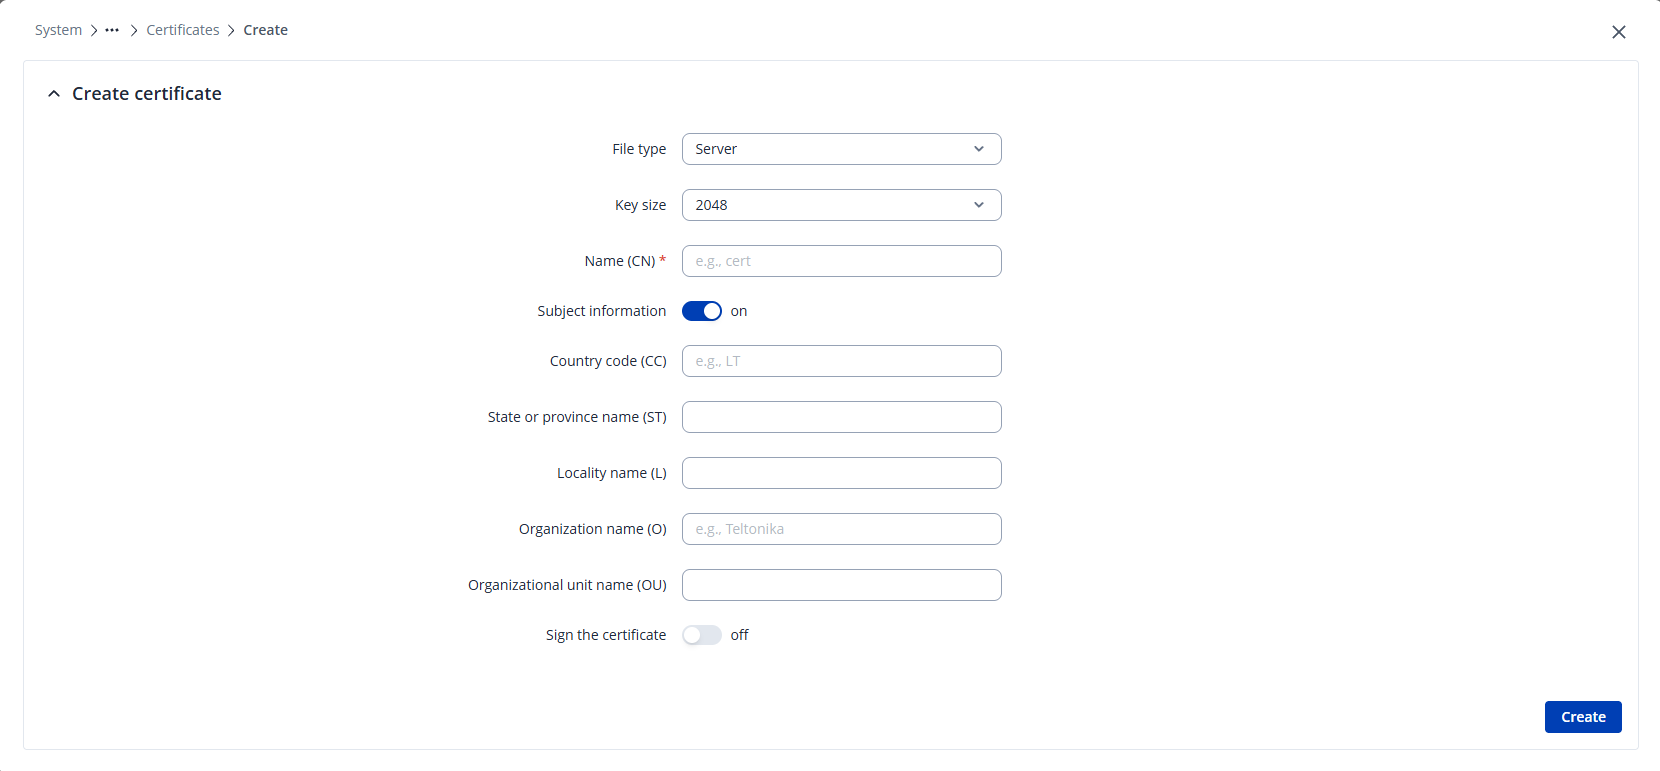
Field Value File type ServerKey size 2048(the default is fine)Name (CN) Optional, descriptive name – e.g. the router's IP address or sms-cert. It's only used to identify the certificate in the list; the actual address validation happens via SAN in the next step.Subject information (CC/ST/L/O/OU) Optional. Pure metadata fields with no functional effect – can be left blank or filled in, e.g. Organization = Kentima.Sign the certificate Off – the certificate is signed separately in the next step, which is where the SAN field for IP addresses is found. -
Click Create. This creates a private key and a certificate request, without signing it.
2. Sign the request with the router's IP address as SAN
-
Find the newly created request in the certificate list. The name from Name (CN) results in two entries: a private key (
<name>.key.pem) and a request of type Request (<name>.req.pem).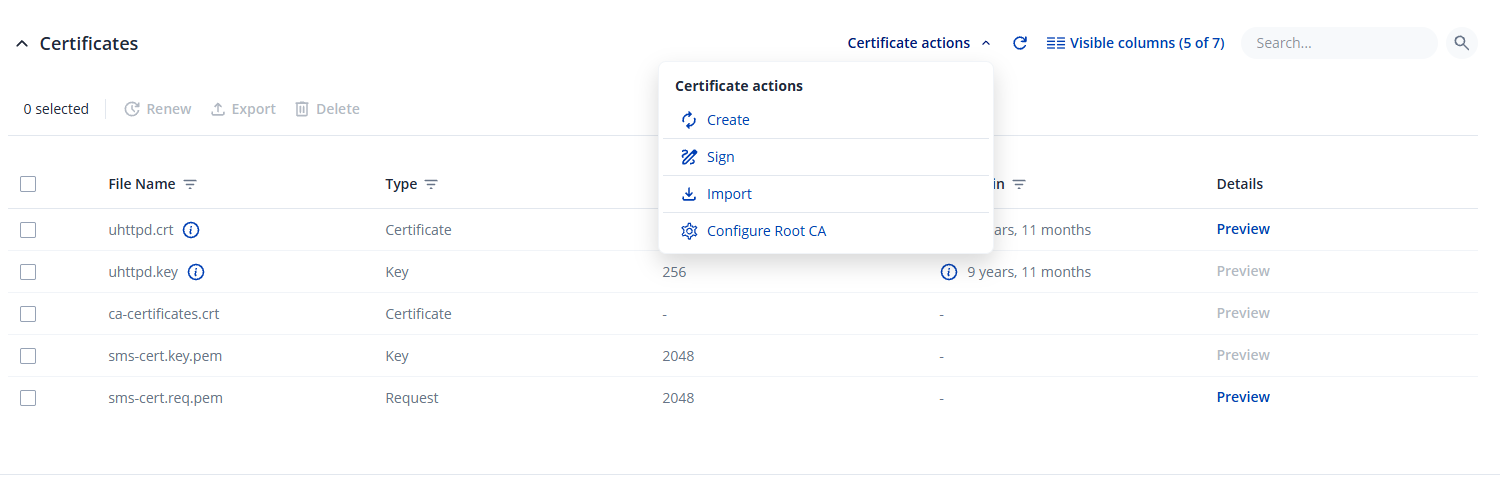
-
Select the request (type
Request) and open Certificate actions → Sign: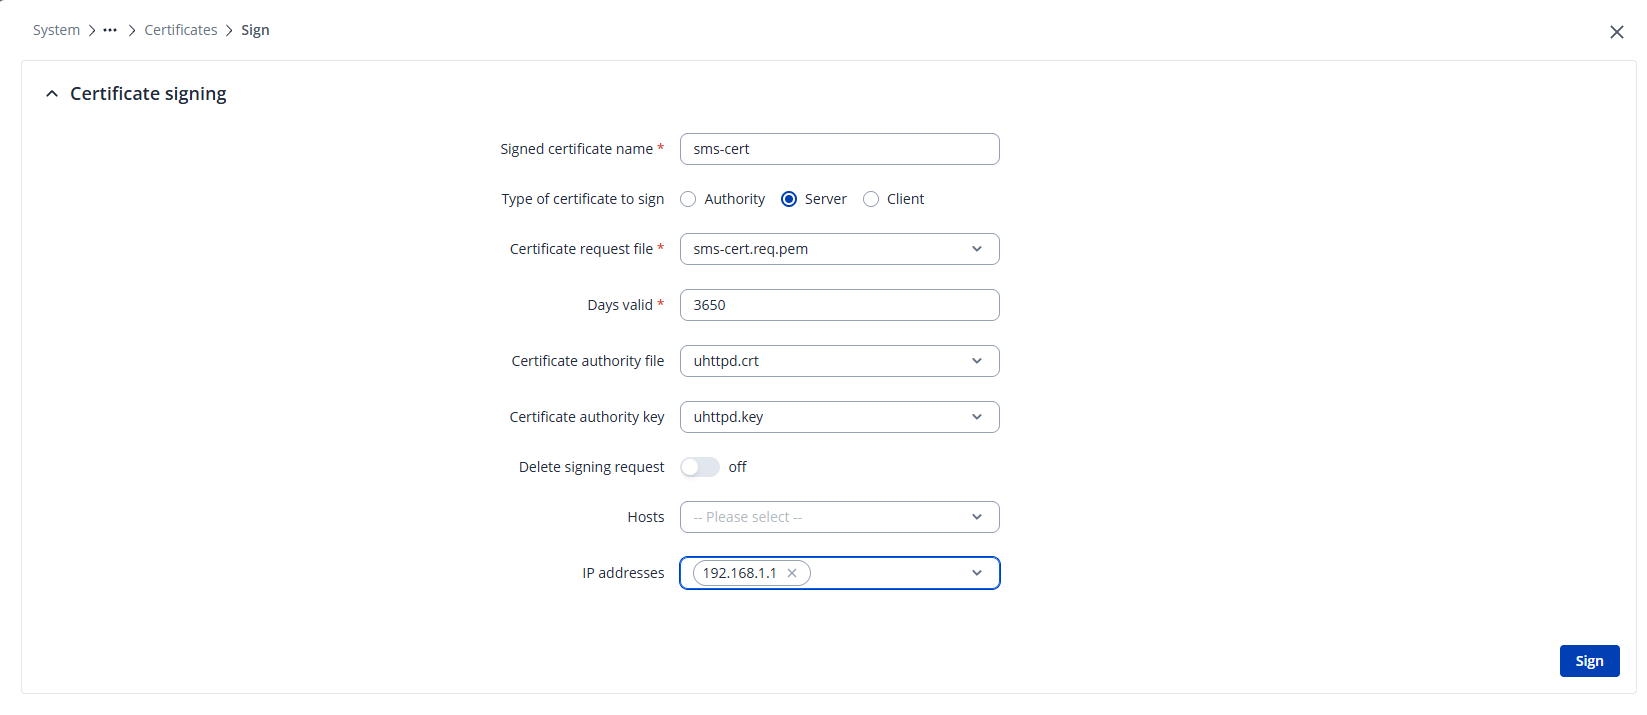
Field Value Signed certificate name Name for the finished, signed certificate, e.g. sms-cert.Type of certificate to sign Server(the same type selected when creating the request).Certificate request file The request of type Request, e.g.sms-cert.req.pem.Days valid Validity period in days, e.g. 3650for 10 years.Certificate authority file / key uhttpd.crt/uhttpd.key– the router's built-in, preinstalled CA. Can be left at the default.Delete signing request Off – otherwise the request cannot be re-signed later, e.g. to add more SAN entries. Hosts Any hostnames/domain names to include as SAN – leave empty if connecting via IP address. IP addresses Enter the router's IP address (e.g. 192.168.1.1) and add it – the address is then shown as a tag in the field. This adds the address as a Subject Alternative Name (SAN). -
Click Sign.
-
Go to System → Administration → Access Control and click Edit on the HTTPS row (the same setting is also reached via System → General → HTTPS configuration):
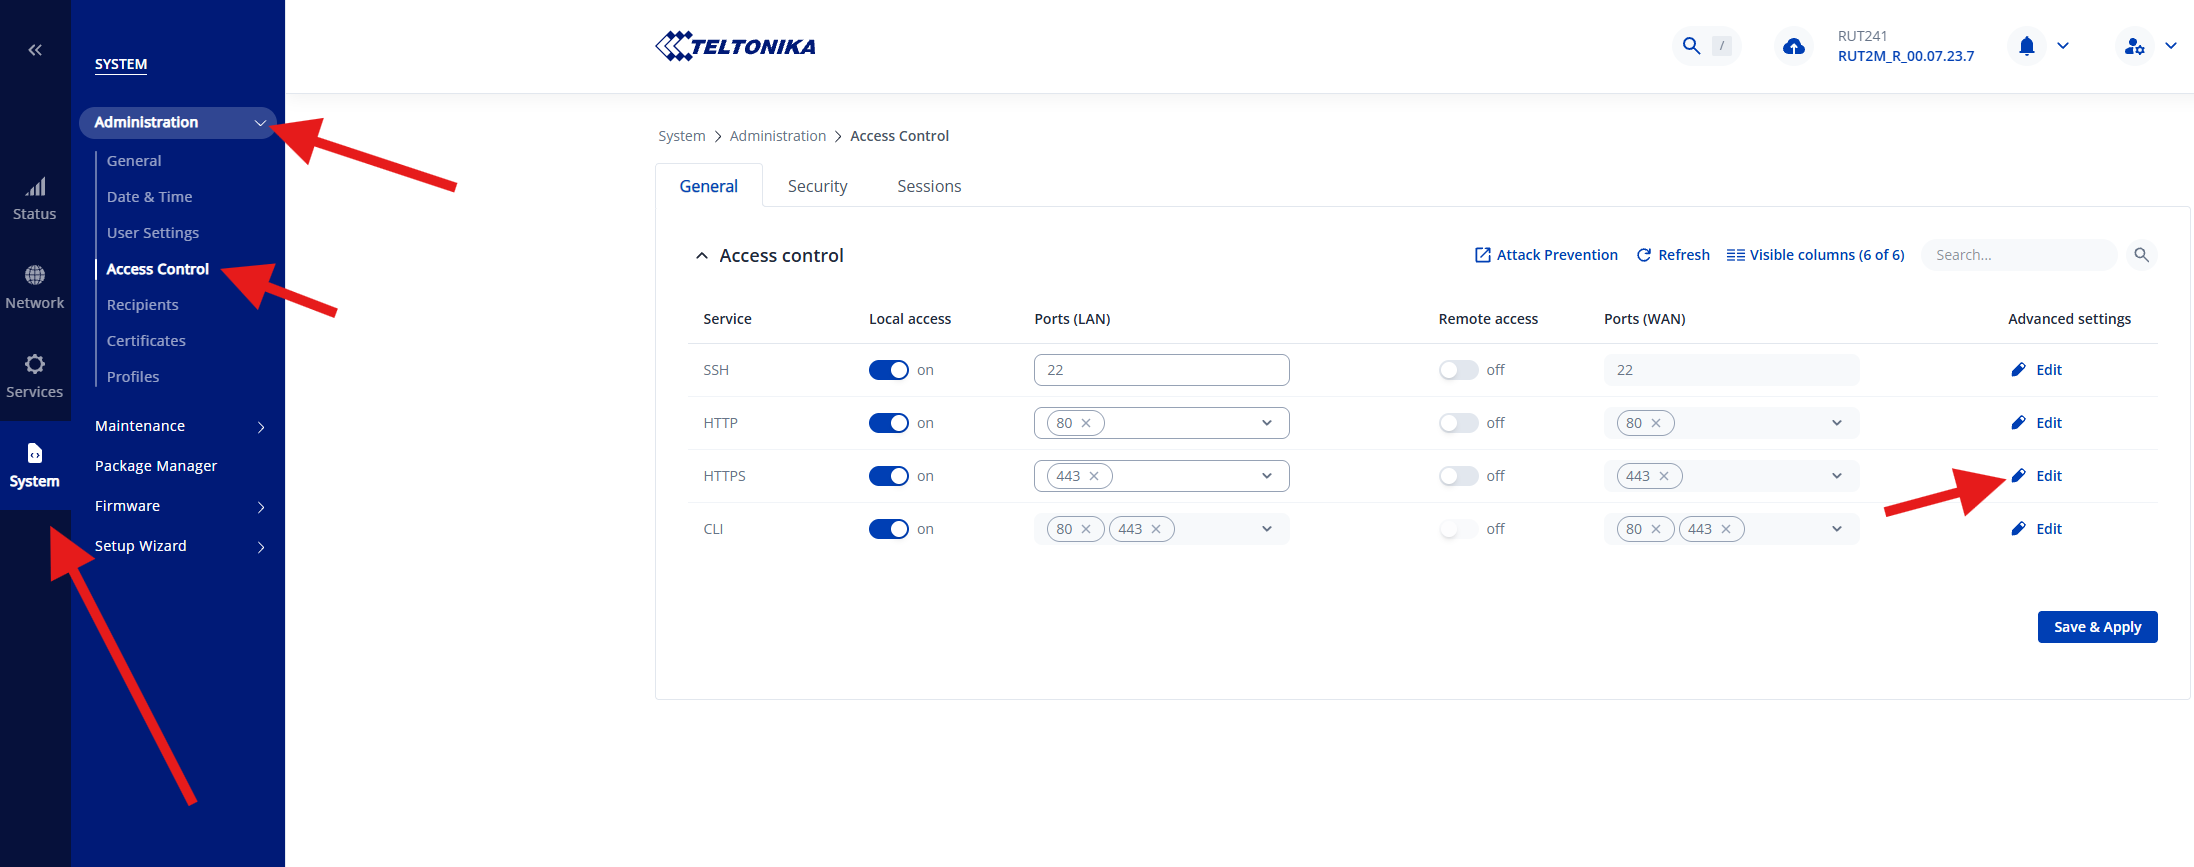
-
Change Server certificate / Server key to the newly signed certificate and its key (
sms-cert.cert.pem/sms-cert.key.pem). Click Save & Apply.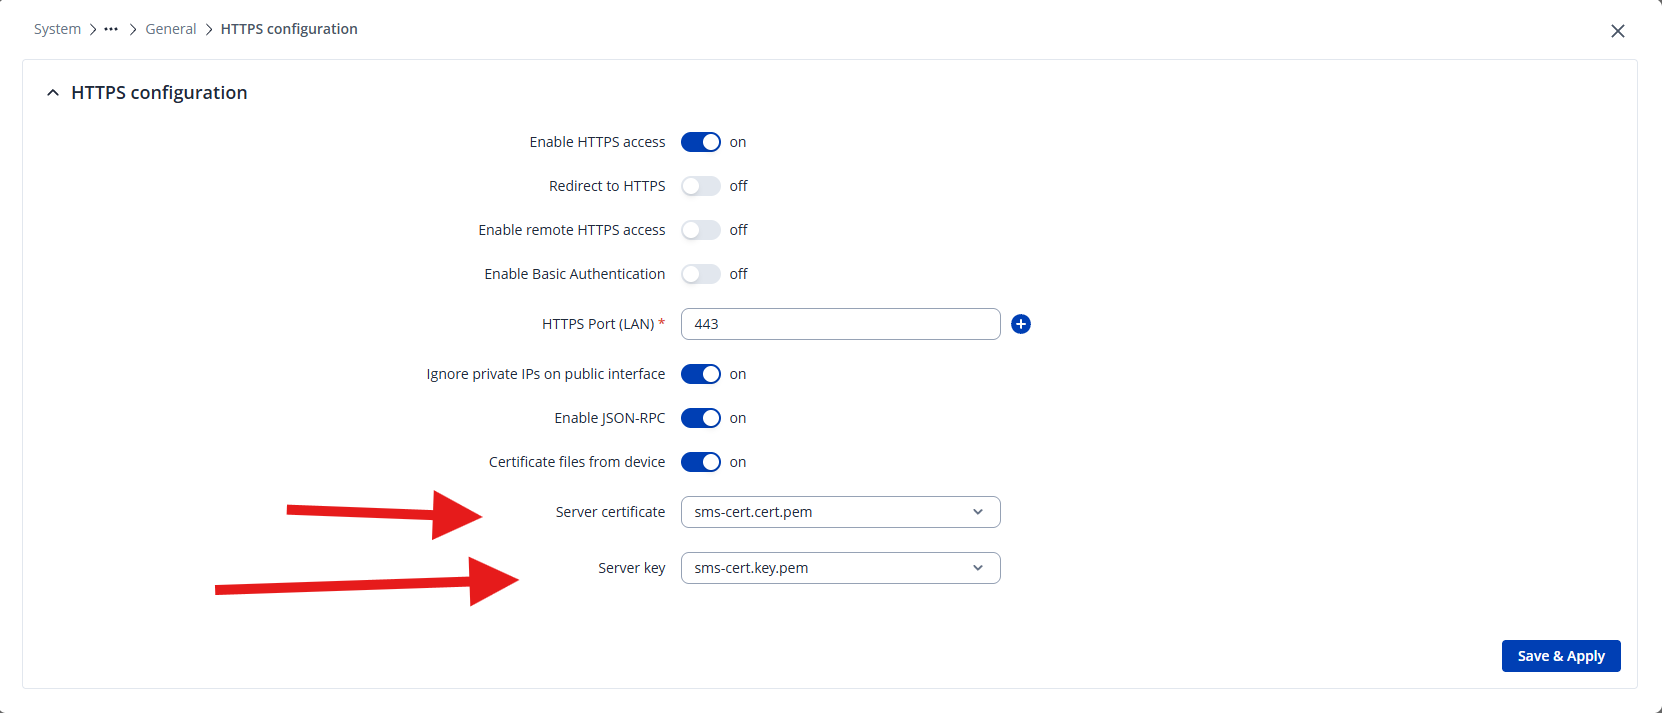
3. Trust the certificate on the server computer
The signed certificate that the router presents to the client during the TLS connection (sms-cert) contains the SAN with the IP address. But for the Windows computer running WideQuick Server to trust that certificate, it must be able to verify who issued it – that's why it's the CA (the router's own issuer), not the signed certificate, that needs to be imported. By trusting the issuer, Windows automatically trusts everything that CA signs, both now and at a future renewal (e.g. if the router's IP address changes and the certificate needs to be re-signed) – without the import having to be redone every time.
- Export the CA certificate
uhttpd.crt(only the CA certificate, not the router's signed certificate or private keys) from the Certificates page. -
Import the CA certificate into Trusted Root Certification Authorities on the Windows computer running WideQuick Server, either via
certmgr.mscor with PowerShell:
After this, Windows/.NET trusts the certificate – both the trust chain (via the imported CA) and the address match (via the IP address in SAN) check out, and SetIgnoreCertificateErrors(true) is no longer needed in the script.
Worth keeping in mind
If the router's IP address changes, the certificate needs to be recreated with the new address as SAN. With multiple routers, it's simpler to set up your own CA and sign all the routers' certificates with it, so that only one CA needs to be trusted instead of one per device.
Function reference
In addition to the functions already used in Usage, the plugin includes a number of functions for diagnostics and operation. The plugin communicates with the router via a built-in REST client, but you normally don't need to worry about that – the SMS functions below cover most needs.
| Function | What it does |
|---|---|
PluginInfo.Version() |
Returns the plugin's version, e.g. "1.0.0" – a good sanity check right after deployment or an upgrade. |
SmsClient.GetQueueLength() |
Number of SMS messages currently waiting in the background queue. |
SmsClient.GetLastSmsStatus() |
The result of the most recently completed send, e.g. "OK 2026-07-03 12:01:44 +46701234567" or "FAILED 2026-07-03 12:01:44 +46701234567: <reason>". Empty string until the first send has completed. |
SmsClient.GetSentCount() / GetFailedCount() |
Counters since the service was last started. Can be polled to detect a successful or failed send as an "event" (compare the value between each run), or to monitor a dead modem or incorrect login credentials in production. |
SmsClient.GetLog() / GetLog(maxLines) |
The most recent log lines (default 50, buffer holds up to 200 lines) – suitable for showing in a diagnostics view. |
SmsClient.ClearLog() |
Clears the in-memory log. |
SmsClient.SetLogFile(path) |
Mirrors the log to a file so the history survives a restart of the service (the in-memory log does not). An empty string ("") turns file logging off again. |
RestClient.SetTimeoutSeconds(n) |
HTTP timeout in seconds, default 10. Also affects how long SendSmsWait() can block in the worst case (roughly 8 × timeout, ~80 s with the default) if a queued send is retrying at the same time. |
Troubleshooting
| Symptom | What to do |
|---|---|
| SMS never arrives | Check GetLastSmsStatus() and GetLastError() – they contain the router's error reason (e.g. failed login or unreachable router). |
| Need a history of what happened | GetLog(200) shows the last 200 plugin events: configuration, sends, retries, and discarded messages. |
| Need history that survives a restart | Call SetLogFile("C:\\Logs\\sms.log") once at startup, then read the file. |
| The "not configured" error | Configure() has not been run in this process – check that the script library holding the configuration is actually being loaded. |
| Nothing works after deployment or an upgrade | Run PluginInfo.Version() from a script. If the call fails, the DLL isn't loaded – check ScriptPluginAssemblies and that the service has been restarted (see Import the plugin), and that no old DLL files are left behind. |
HTTP 401, or a log line starting with router redirected http:// to https:// |
The router requires https – check that url in Configure(...) starts with https://, and that Redirect to HTTPS is enabled under System → Administration → Access Control → HTTPS if you're unsure. |
"Modem 'X' not found on this router" |
The modem id given in Configure(...) does not exist on the router. GetLastError() lists the router's actual modem ids – fix the argument, or use the three-argument variant of Configure() to let the plugin auto-detect the modem instead. |